Guides for exploring, managing a business, working as a sales rep and advertising.
Use “Print / save PDF” and choose to save as PDF in your browser’s dialog. Current prices and terms are shown on the website.
I want to explore
Your first tour of the map
Learn what you’re looking at and find your first place in a few minutes.
Before you start
All you need is a browser and an internet connection. You don’t need an account to use the map.
Get ready
Follow the steps
Check
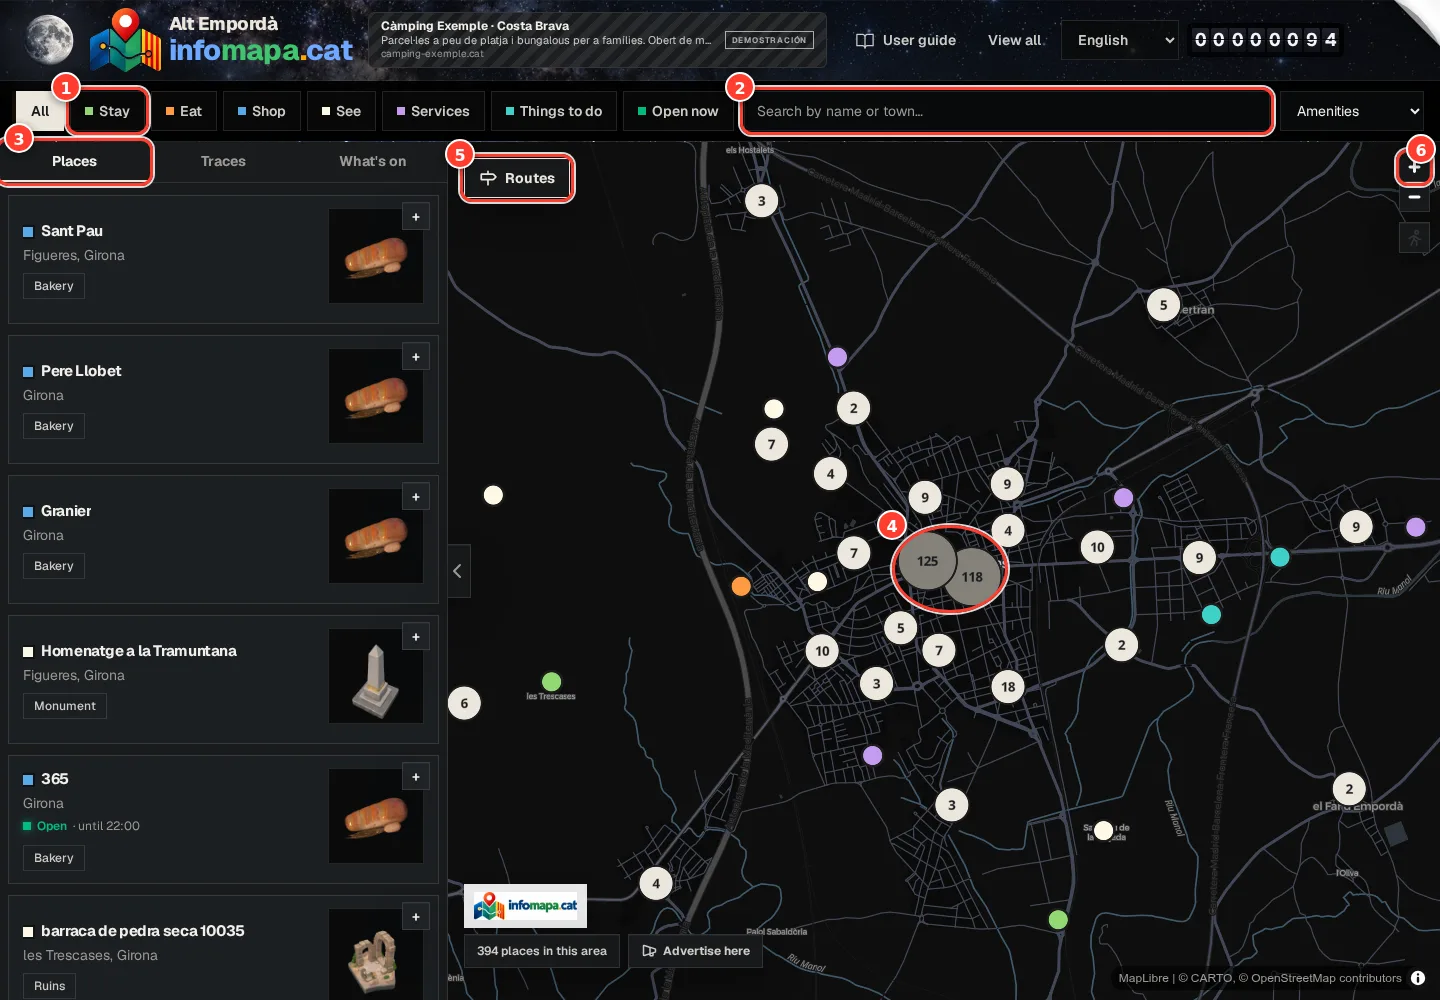
Real screenshot of the tool. Overview of the map on a computer: the numbers point to what you’ll use on your first tour. Details and prices may change.
Categories: narrow down what you see on the map and in the list.
Search: by place name or town.
Places, Traces and What’s on tabs: the list of what’s in the visible area.
Numbered clusters: several places together; zoom in to separate them.
Routes: ready-made itineraries.
Zoom (+ and −), and walk mode below it.
Step by step
01
Choose where to look
Open the map. The header shows the county (comarca) you’re viewing. If several are published, the selector lets you switch area. You can also drag the map: the county name follows the place you’re exploring.
02
Zoom in on the town or neighbourhood
Drag with the mouse or a finger. Use the + and − buttons, the mouse wheel or two fingers to change the scale. Circles with a number group several places together; zoom in to tell them apart.
03
Look at the map and the list together
The list shows the places in the visible area and changes when you move the map or apply filters. On a computer it sits on the left and you can fold it away with the arrow to see more map. On a phone it lives in the bottom sheet: tap «N places in this area» or drag it up. «View all» opens the directory as a list.
04
Open something that interests you
Tap a marker or the name of a result to see the place. From its listing you can check the details, get directions and add it to your route. Gold or silver mushrooms are businesses that pay to stand out; they are not a quality rating.
05
Look up any spot, even without a listing
Right-click on the map, or press and hold on a phone. «This spot» opens, with coordinates, address and elevation when available, plus nearby places. You can copy the coordinates, share the link or get directions.
If something doesn’t go as expected
I only see a few places
Zoom out and check your filters: results always come from the area on your screen. If you see «500+», zoom in or filter to narrow it down.
When you finish
You’ll know how to move around an area, read the markers and open a listing.
Check you’ve got it
I’ve changed the scale and the area.
I’ve opened a listing from the map or the list.
Guide on the web: /en/manual/primeros-pasos
I want to explore
What everything on the map means
Markers, clusters, figures, mushrooms, traces, ground logos and every other sign, explained one by one.
Before you start
Open the map and zoom in on a town with plenty of places. Some signs only appear from a certain zoom level.
Get ready
Follow the steps
Check
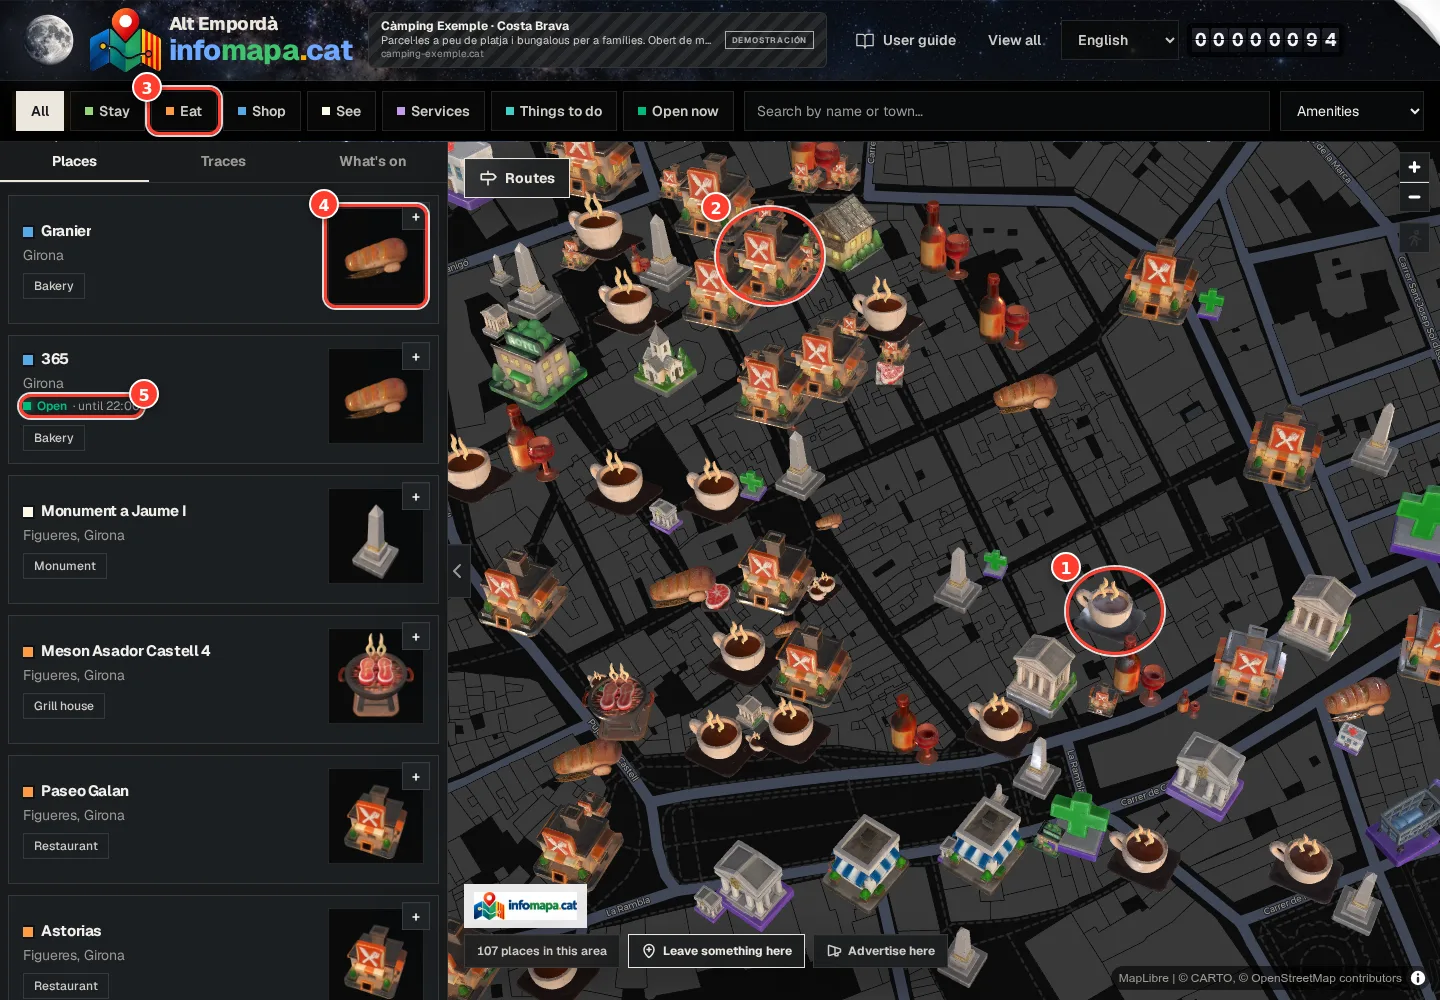
Real screenshot of the tool. Up close, each place is drawn with the figure of its type and the colour of its category. Details and prices may change.
Each 3D figure is a type of place (here, a café).
The figure’s colour is its category: orange, Eat.
The colours match the category buttons.
In the list, each place with the same figure.
«Open · until 22:00»: today’s opening hours, if the place has given them.
Step by step
01
Colours and clusters
Each place carries the colour of its category: the same colours you see next to the category buttons at the top. When many places are close together they are grouped in a circle with a number; zoom in or tap it to separate them.
02
3D figures
When you zoom in on a village or neighbourhood, each place is drawn as a small figure of its type: a cup for a café, a house for accommodation, a castle for a monument. On a computer, hovering over a card in the list lights up its figure on the map.
03
Coloured mushrooms
A gold or silver mushroom, or one in the colour chosen by the administrators, marks a place with a visibility plan. It means the business chose to stand out, not that it’s better than the others.
04
Traces
Once you can make out the streets, traces appear: stories people leave at a spot. Each format has its own figure: a scroll for texts, a painted wall for photos, a stage for videos and a microphone for recordings. Tap them to open them.
05
Logos painted on the ground
Some logos are drawn over the streets, life-size and see-through. They are ground ads: they show up at village scale or closer, grow with the map like a building and have no link.
06
Other signs
With the «What’s on» tab open you’ll see calendar pages with the day of each event. A dashed line with numbered stops is the route you have open. The pulsing blue dot is your position in walk mode. The «Advertising» box in the corner is an ad and closes with its ×. The number in the header (on a phone, inside the ☰ menu) is the website’s visit counter.
If something doesn’t go as expected
No traces appear
Traces are only drawn very close up. Zoom in until you can see the streets clearly; not all of them appear in the «Traces» tab.
A logo covers a street I want to see
Ground ads are see-through and sit below street names. Zooming in makes the streets easier to read through the logo.
When you finish
You’ll recognise each element at a glance and know what happens when you tap it.
Check you’ve got it
I can tell a figure, a mushroom and a trace apart.
I know what a line with numbered stops means.
Guide on the web: /en/manual/leyenda-del-mapa
I want to explore
InfoMapa’s own words
Trace, figure, mushroom, pack, walk mode… What each of the site’s own words means.
Before you start
Nothing needed: it’s a small dictionary to look up whenever a word means nothing to you.
Get ready
Follow the steps
Check
Step by step
01
Trace
A text, photo, video or recording that someone pins to a spot on the map: a memory, a story about the place. You find them by zooming in or in the «Traces» tab. Leaving one has a yearly price.
02
Figure
The 3D drawing of each place when you zoom in: a cup for a café, a house for accommodation. It tells you what kind of place it is at a glance.
03
Mushroom
The gold or silver mushroom that replaces the marker of some businesses: they have paid for a pack to stand out. It is not a quality score.
04
Pack (or plan)
What a business buys to make its listing stand out for a year: «Ficha completa» (full listing, silver mushroom) or «Ficha completa + anuncios» (full listing with ads, gold mushroom and its own ad). The basic listing is free.
05
Ground logo
A logo painted over the streets of the map, life-size and see-through. It’s advertising without a link, like a sign in the landscape.
06
This spot
The window that appears when you right-click (or hold your finger still) anywhere on the map: address, coordinates, elevation and what’s nearby.
07
Walk mode
The walking-person button: the map follows you by GPS as you walk and lets you know about traces nearby.
08
Clear
Removes all filters at once.
09
View all
Every place in the directory as a list, in case you’d rather read than look at the map.
10
About us
The introduction to InfoMapa: what it is and what it can do for a business, with its advertising options.
11
Demo
If you see «Demo» on an ad or «demo mode» on a screen, it’s a test: nothing is charged and, on the demo website, nothing is saved.
12
The number in the header
The website’s visit counter. The prices of packs, traces and logos are based on it.
If something doesn’t go as expected
Words change in other languages
In Catalan you’ll see rastre, neteja or veure’ls tots; in Spanish, rastro, limpiar or ver todos; in French, trace, effacer or voir tout. They are the same things as in this list.
When you finish
You’ll understand every button and sign without having to guess.
Check you’ve got it
I know what a trace is and what a mushroom means.
I know what «Clear» does.
Guide on the web: /en/manual/palabras-de-infomapa
I want to explore
Find exactly what you need
Combine name, category, amenities and opening hours without getting lost in results.
Before you start
First move the map to the area you’re interested in. Filters apply to that view.
Get ready
Follow the steps
Check
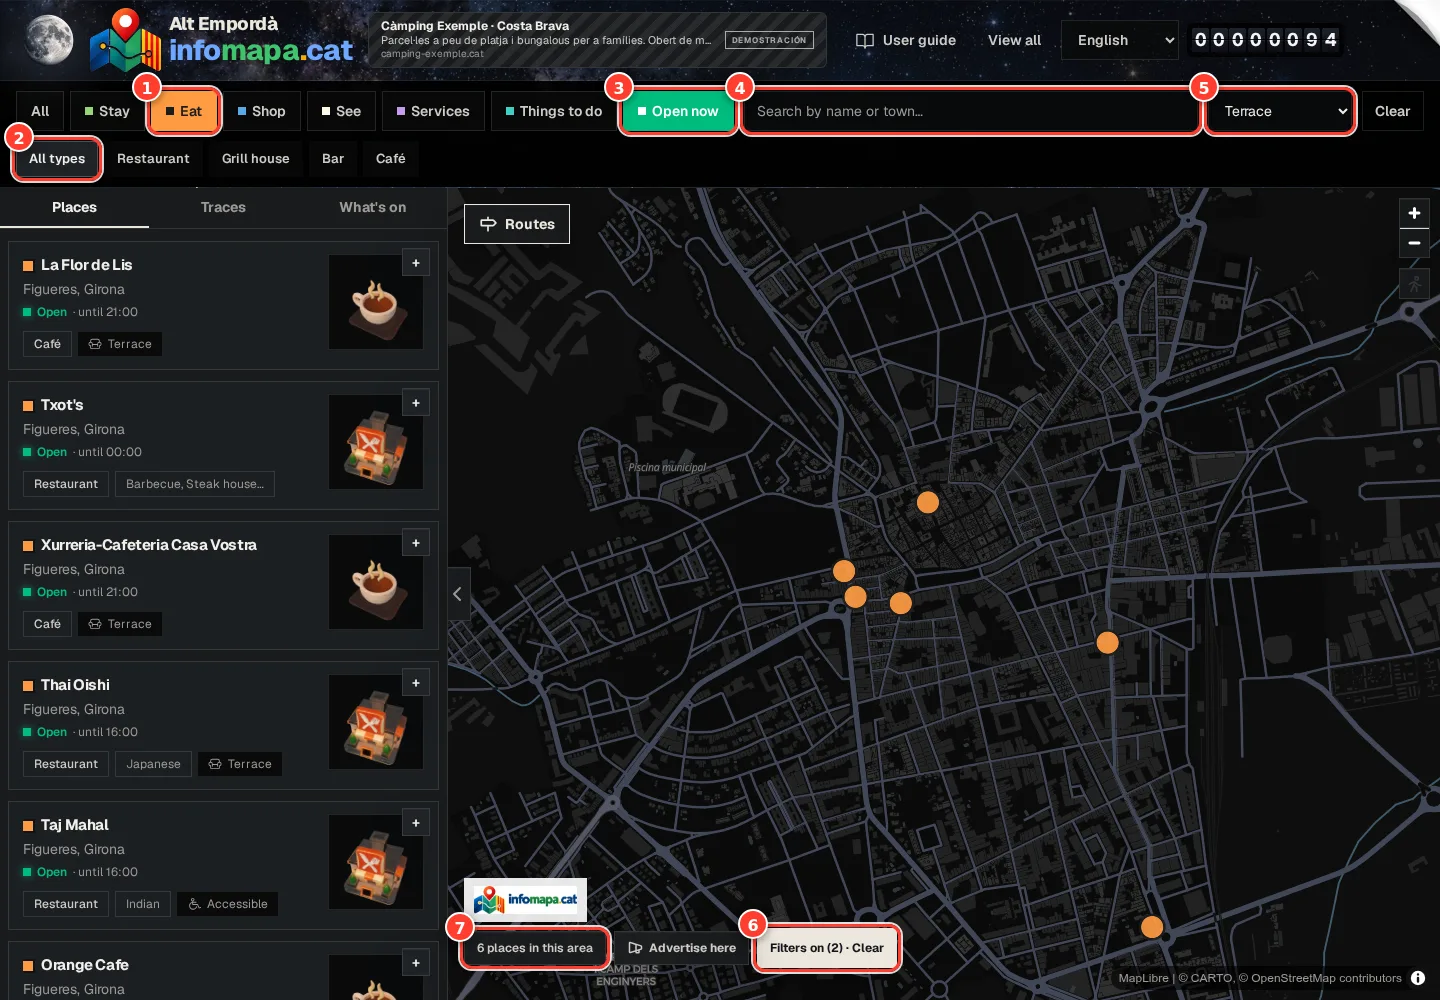
Real screenshot of the tool. Three filters at once: category, open now and an amenity. Details and prices may change.
Selected category: the map and list show only that one.
Types within the category (Restaurant, Grill, Bar…): to narrow it down further.
Open now: only what’s open right now according to its hours.
Search by name or town.
Amenities: terrace, pool, parking, pets…
How many filters are on, and «Clear» to remove them all.
How many places meet every filter in the area you’re viewing.
Step by step
01
Start with a category
Pick Stay, Eat, Shop or another available category. Choosing one shows its types and amenities. When you switch category, filters that no longer make sense are removed.
02
Type a name or town
Use the search box to find a specific business or narrow things down by town. It searches within the area you’re viewing: it doesn’t move the map to the town you type, so if it’s far away, zoom out first. On a phone the search box is always at the top, and results appear in the bottom sheet.
03
Refine with the available controls
Choose the type of place in the second row and one amenity from the drop-down, such as terrace, parking or pets allowed (one at a time). For accommodation you can set how many it sleeps. On a phone, extra controls open from «Filters».
04
Use «Open now» wisely
This filter shows places whose published hours can be read and say they’re open. A business with no hours is left out even if it may be open. Before you set off, check the listing or call if you need to be sure.
05
Widen the search when nothing shows up
Remove one filter at a time or press «Clear» (next to the map you’ll see how many filters are on). Also switch off «Open now» if it’s still selected, and zoom out. Use «View all» if you’d rather browse the directory.
If something doesn’t go as expected
The place exists but doesn’t show up
It may be outside the view, not have the amenity ticked or have no opening hours. Try «All», delete the text and switch off «Open now».
When you finish
You’ll be able to turn a broad search into a useful shortlist.
Check you’ve got it
I’ve combined a category with an amenity.
I know how to remove filters I no longer need.
Guide on the web: /en/manual/buscar-y-filtrar
I want to explore
Everything you can do with a listing
Look up details, get in touch, get there and share its location with a QR code.
Before you start
Open a place from the map, the list or «View all». Each listing shows whatever information it has published.
Get ready
Follow the steps
Check
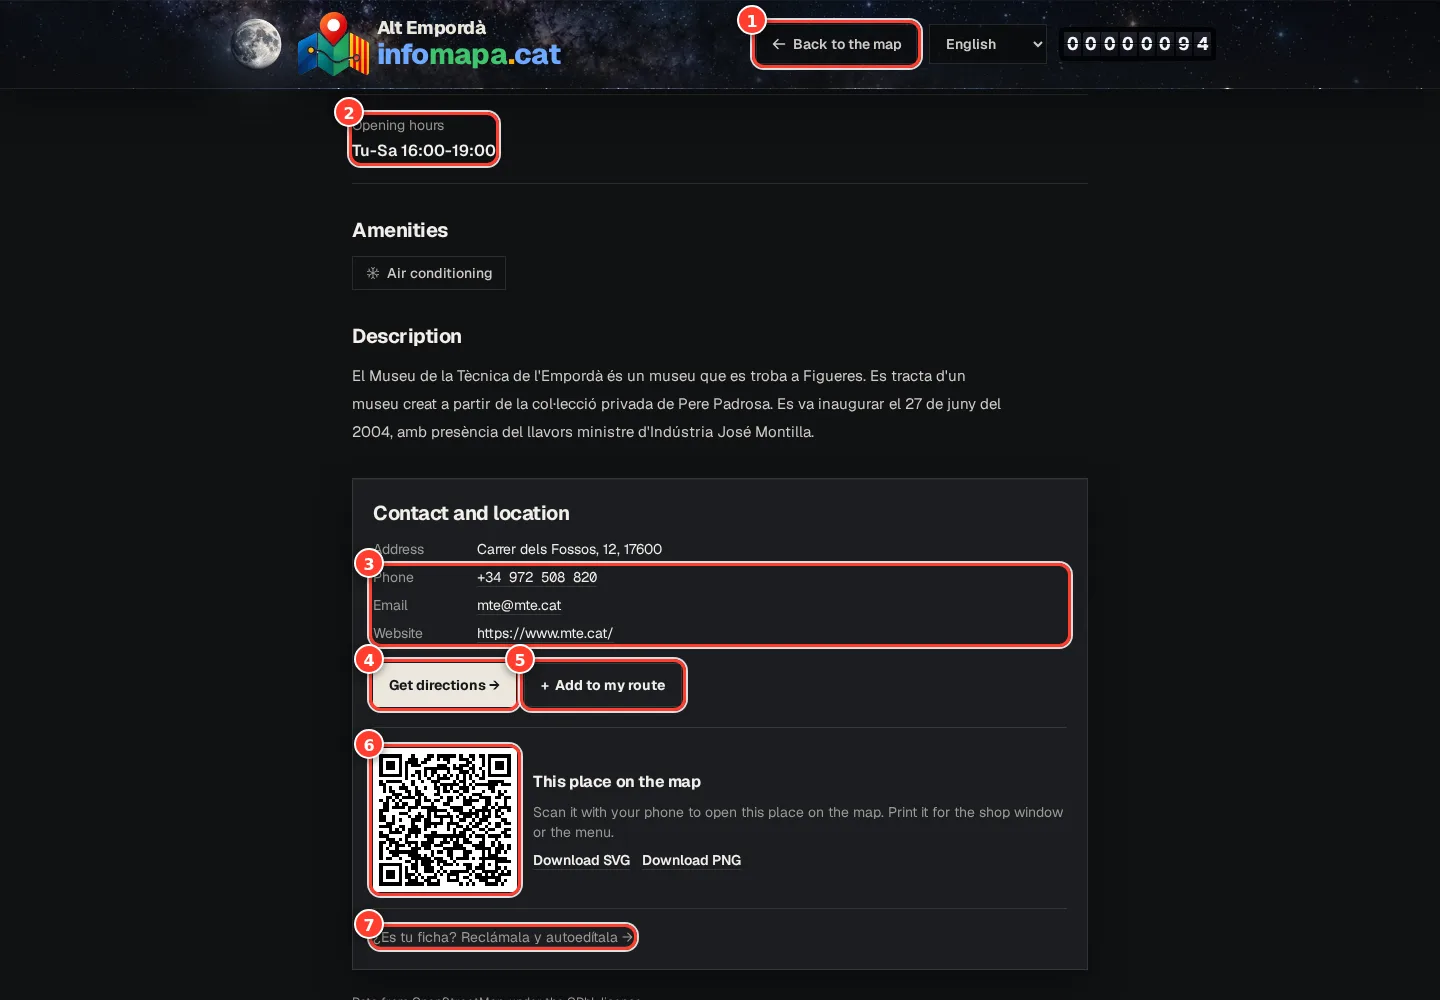
Real screenshot of the tool. The useful part of a listing: hours, contact, directions, your route and the QR code. Details and prices may change.
Back to the map: returns to where you were, with the same zoom and filters.
Opening hours, as given by the place.
Phone, email and website: tap them to call, write or open.
Get directions: opens Google Maps with the destination set.
Add to my route: saves it to your own route.
The place’s QR code: to print in a shop window or on a menu.
«Is this your listing?»: the owner claims it to edit it.
Step by step
01
Check the details that matter for your visit
Look at the description, images, opening hours and amenities. Depending on the category there may be number of guests, bedrooms, price per night or type of cuisine. If a detail is missing, that doesn’t mean the place doesn’t offer it.
02
Get in touch directly
Tap the phone number, email or website when available. Bookings and questions are handled with the business through those channels; the listing on its own doesn’t confirm a booking.
03
Decide how to get there or save it to your route
«Get directions» opens external directions. «Add to my route» keeps the place in your personal itinerary. You can go back to the map to keep searching from the area you were viewing.
04
Share the place
Copy the listing’s address or use its QR code. The code opens the place on the map and can be downloaded as SVG or PNG to print. If the place has comments open, you can also read them and join in by confirming your email.
If something doesn’t go as expected
Some information is wrong
Check the detail with the business. If it’s your establishment, claim the listing and update it from the client area.
When you finish
You’ll have the details you need to decide and go from the map to the visit.
Check you’ve got it
I can find the contact details and directions.
I’ve found the button to add the place to my route.
Guide on the web: /en/manual/consultar-fichas
I want to explore
Look up any spot on the map
Address, GPS coordinates, elevation and nearby places for any location, even without a listing.
Before you start
It works on the main map, on computers and phones. You don’t need an account.
Get ready
Follow the steps
Check
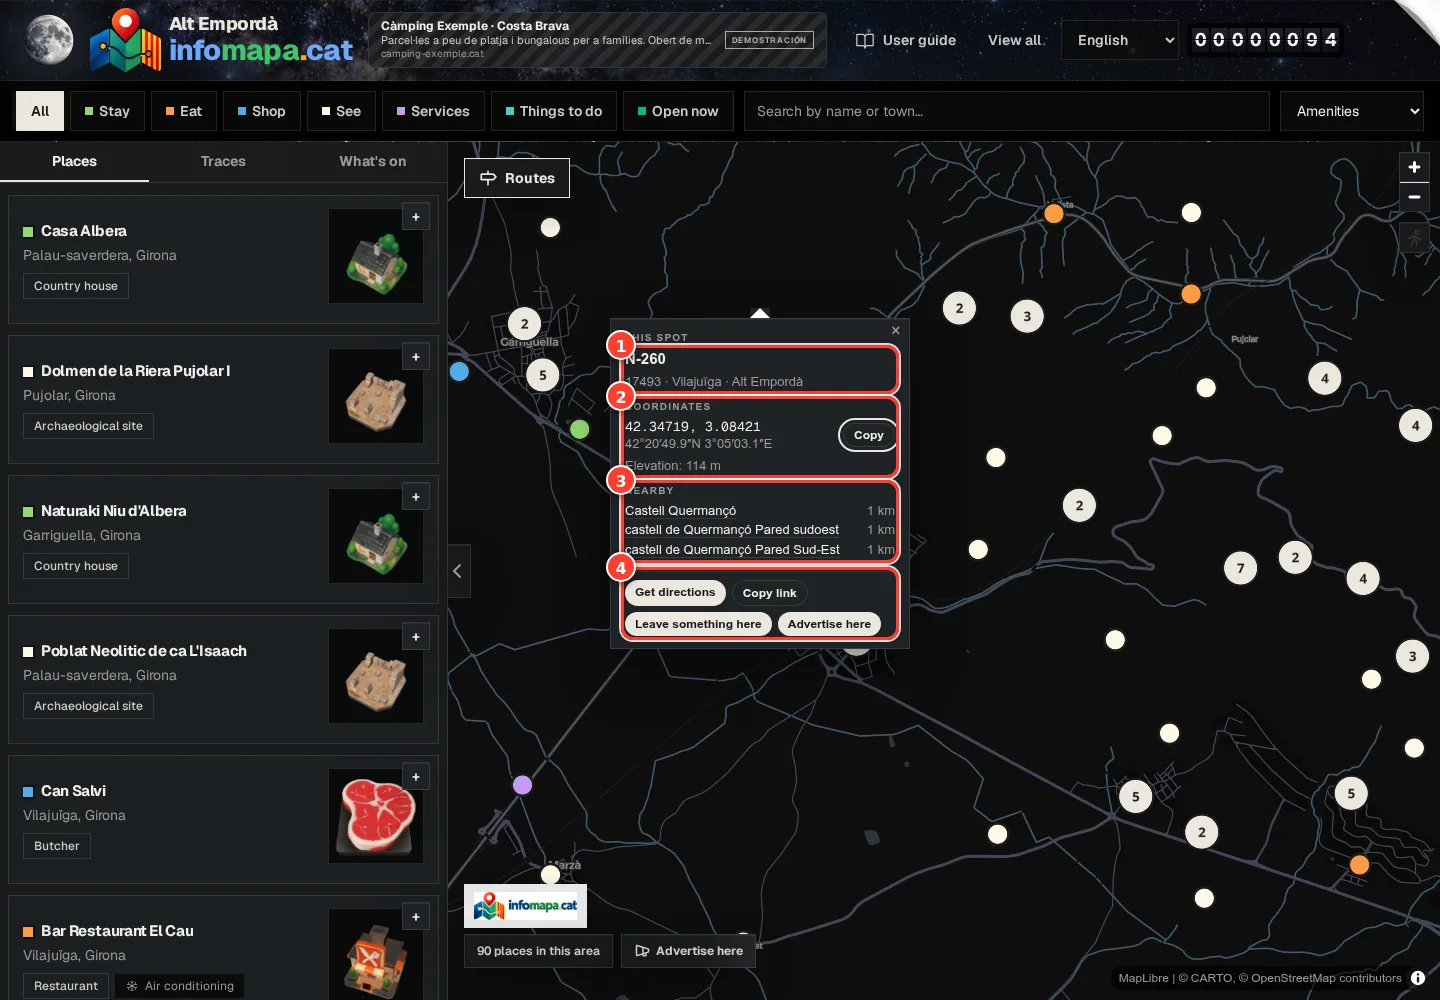
Real screenshot of the tool. Right-click (or hold your finger still for a second) anywhere on the map. Details and prices may change.
The spot’s address: street or road, postcode, town and county.
Coordinates in two formats, with «Copy», and the elevation.
The nearest places, with their distance.
Get directions, copy the spot’s link, leave a trace or advertise right there.
Step by step
01
Open the spot’s card
On a computer, right-click the location. On a phone, hold your finger still on the map: a ring fills up and, after one second, the card opens. If you move your finger, it cancels and you can keep dragging the map.
02
See where you are
«This spot» immediately shows the coordinates in decimal and in degrees, minutes and seconds. Within a second or two it adds the address (street, number, postcode, town and county) and the approximate elevation above sea level.
03
Copy the coordinates
Press «Copy» to take the decimal coordinates and paste them into your navigation app, a message or a form. The coordinates are exact; the address and elevation are looked up rounded to about ten metres.
04
See what’s nearby
If there are places from the directory within 2 km, you’ll see the three closest with their distance. Tap one to open its listing.
05
Use it as a destination or share it
«Get directions» opens directions to that spot. «Copy link» gives you an address that opens our map right there. From the same card you can leave a trace or advertise at that spot. Close it with the × or by tapping elsewhere on the map.
If something doesn’t go as expected
No address appears
At sea, in the hills or on unnamed tracks there may be no address: you’ll see «No known address». The coordinates and elevation are still valid.
The copy button does nothing
Some browsers only allow copying on secure pages (https). Select the coordinates text and copy it by hand.
When you finish
You’ll know how to get information about a location and share it or use it as a destination.
Check you’ve got it
I’ve opened the card for a spot with no place.
I’ve copied its coordinates or its link.
Guide on the web: /en/manual/consultar-un-punto
I want to explore
Plan and share your own route
Put your favourite places together, put them in order and send the route to someone else.
Before you start
You don’t need an account. Your route is saved in this browser; keep its link if you want to open it on another device.
Get ready
Follow the steps
Check
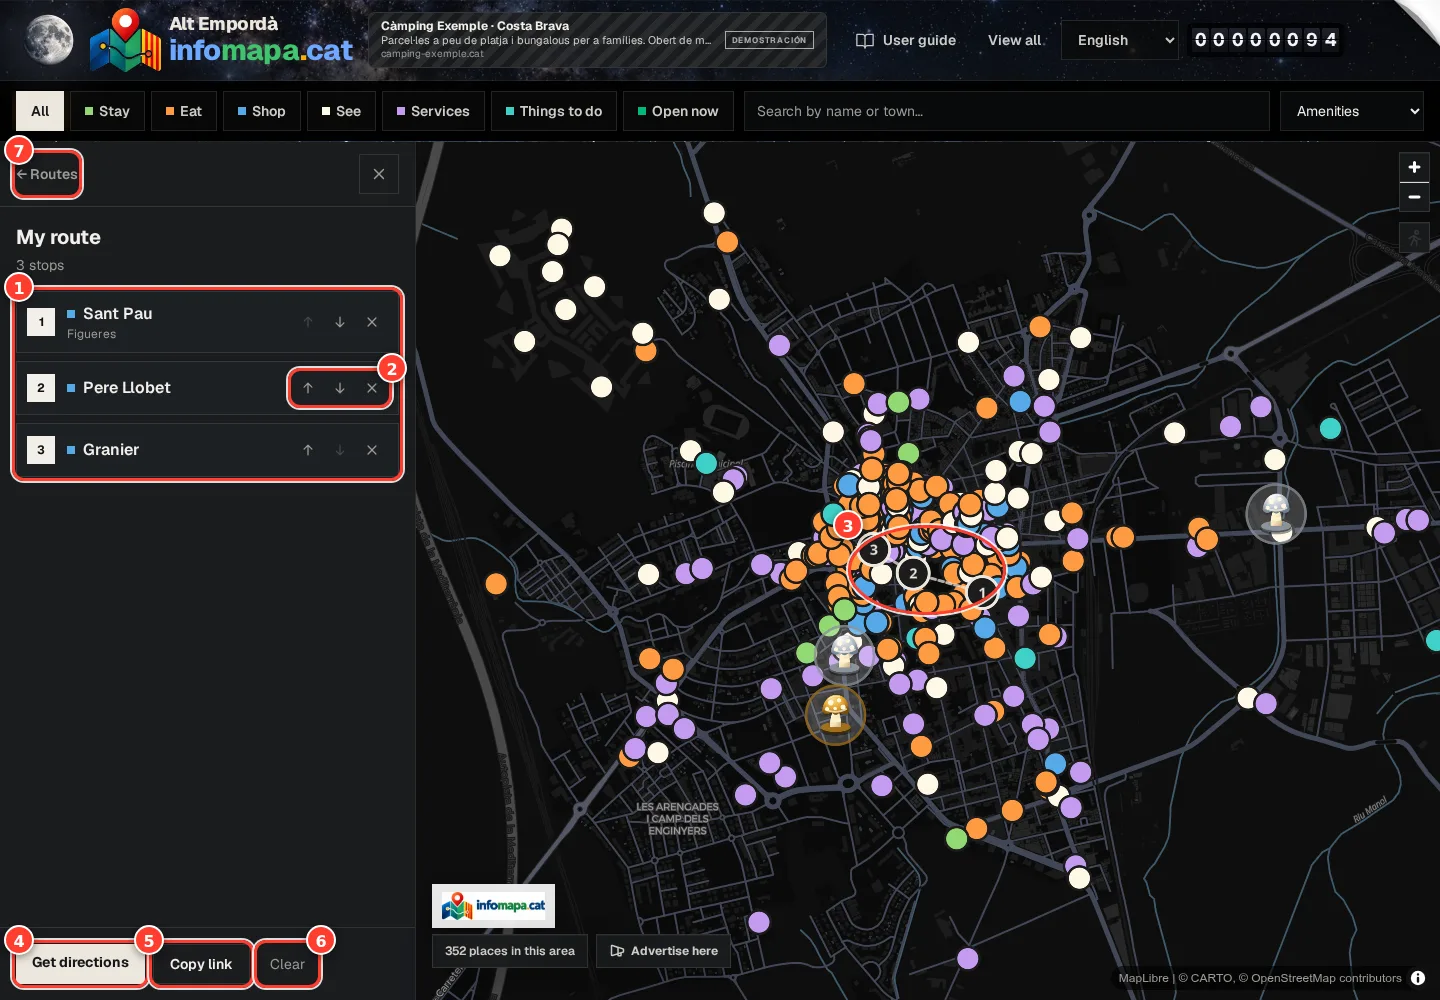
Real screenshot of the tool. Your route: the stops in order, in the list and on the map. Details and prices may change.
Your stops, in the order you’ll visit them.
Arrows to change the order and ✕ to remove a stop.
On the map, each stop with its number.
Get directions: opens Google Maps with all the stops in order.
Copy link: to send the route to someone else.
Clear: start a new route.
Back to the list of published routes.
Step by step
01
Add stops
Tap the + on a place in the list (it turns into ✓) or «Add to my route» inside its listing. You can gather up to 25 places without repeating any. For example: breakfast, a cultural visit and lunch.
02
Put the route in order
Open «Routes» and then «My route». Move stops up or down with the arrows and remove the ones you don’t need. Check the order on the map: it’s your selection, not an automatically optimised route.
03
Share a copy of the plan
Press «Copy link» and paste it wherever you like. The other person opens a «Shared route» and can save it as their own. The link keeps the stops that were there when you copied it; copy it again after changing the route.
04
Move on to directions
Use «Get directions» to open Google Maps. The link accepts a limited number of points and may cut a long route short; check the stops when it opens and split the plan into sections if needed.
05
Discover ready-made itineraries
«Routes» also lists published itineraries, with their stops and text. Each route appears in the language it was written in. Some include a link to Wikiloc: if available, you can see the track and GPX download options there.
If something doesn’t go as expected
My friend can’t see my latest changes
Shared links don’t sync live. Copy and send a new link.
I pressed «Clear» by mistake
«Clear» deletes the route straight away, without asking. If you had shared it, open that link and save it again as your own.
I want to download a GPX
«My route» shares places and opens directions. A GPX download depends on the external Wikiloc link of a published route, when there is one.
When you finish
You’ll create an ordered list of stops that you can share.
Check you’ve got it
I’ve added and ordered several stops.
I’ve opened my shared link to check it.
Guide on the web: /en/manual/crear-rutas
I want to explore
Find out what’s on nearby and go for a walk
Browse events by date and use your location to explore the surroundings.
Before you start
You can browse what’s on without an account. For walk mode, turn on your device’s location and allow the browser to use it.
Get ready
Follow the steps
Check
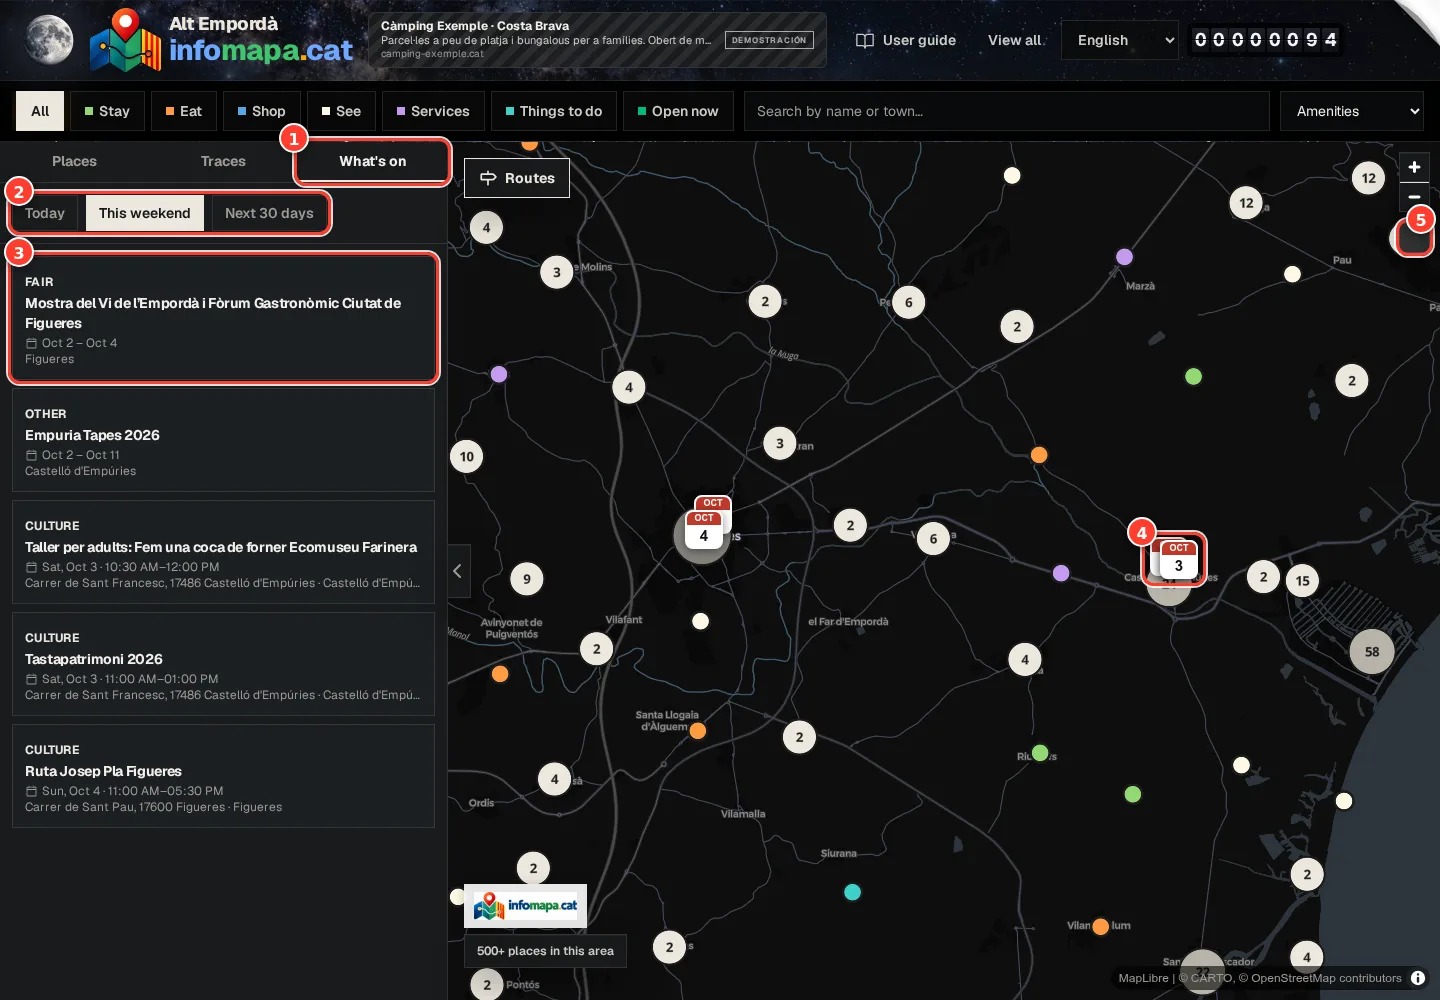
Real screenshot of the tool. What’s on shows the events in the area you’re viewing, by date. Details and prices may change.
What’s on tab: events in the area you’re viewing.
When: today, this weekend or the next 30 days.
Each event: type, name, dates and place. Tap it to see it on the map.
On the map, a calendar page with the day of the event.
Walk mode: the map follows you as you walk and tells you what’s nearby.
Step by step
01
Open the «What’s on» tab
It sits next to «Places» and «Traces». On a phone, tap «N places in this area» in the bottom sheet: the three tabs are there. Events are searched within the visible area of the map.
02
Choose the dates
Pick «Today», «This weekend» or «Next 30 days». Open an event to see its details, more info and directions. If nothing shows up, move the map or try other dates.
03
Turn on walk mode
In the map controls (top right), tap the walking-person icon. Accept the location permission. The map zooms in and follows your position by GPS while the mode is on.
04
Explore at your own pace
If you drag the map, it stops following you so you can look around. Use «Follow me again» to re-centre it. Near a trace you may get a prompt to open it. When you’re done, tap «Stop walking».
If something doesn’t go as expected
The map doesn’t follow me
Check the location permission in your browser and system settings. If you had dragged the map, turn following back on. You can keep browsing places without sharing your location.
When you finish
You’ll be able to combine places, activities and discoveries on a day out.
Check you’ve got it
I’ve changed the date range.
I know how to start and stop walk mode.
Guide on the web: /en/manual/agenda-y-paseo
I want to explore
Find and leave stories on the map
Discover traces: texts, photos, videos and voices tied to a place.
Before you start
To read them, just explore. To leave a trace you need an email address, your own or authorised content, and to check the price and rules. The trace form is currently in Spanish.
Get ready
Follow the steps
Check
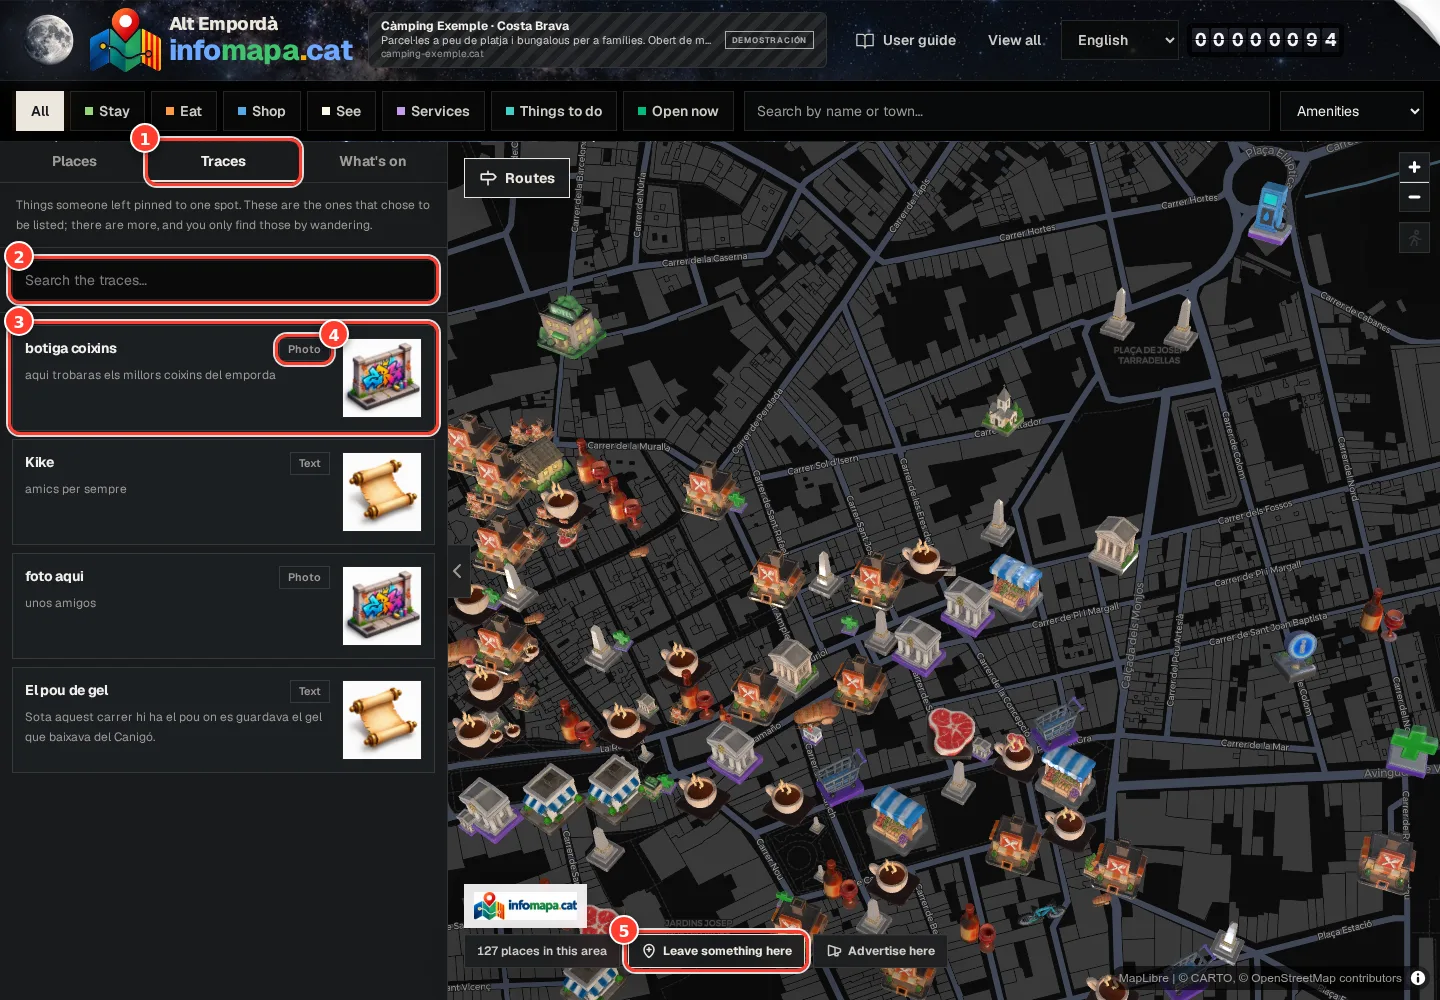
Real screenshot of the tool. The Traces tab gathers the ones that chose to appear in the list. Details and prices may change.
Traces tab: what people have left at a spot and chosen to show in the list.
Search within the traces.
Each trace: title, an excerpt and the figure for its format. Tap it to go and see it.
The format: Text, Photo, Recording or Video.
Leave something here: appears when you zoom in; leaves a trace at the centre of the map.
Step by step
01
Look for stories near the place
Zoom in until you can see the streets. Some traces only appear when you explore up close; the «Traces» tab gathers the ones that chose to appear in the list. Open one to read it or play its content.
02
Choose the spot for your story
Zoom in until you can see the streets and tap «Leave something here» (on a phone, the pin icon with a +), or right-click a specific spot (hold your finger still for a second on a phone) and choose «Leave something here». Check in the form that the crosshair is where you want it. The content must relate to that spot: a memory of the neighbourhood, a picture of the place or a short local story.
03
Choose the format and prepare the content
The form offers text, image, video and recording. Text allows 120 words; the other formats can include up to 60 words. Images can be up to 3 MB and recordings up to 8 MB and 3 minutes. Always check the limits shown before you send.
04
Read the rules and check the price
Check the rights to the content, the consent of anyone who appears and the publishing conditions. Leaving a trace has a yearly price, different for each format, shown before you pay. Sending and paying doesn’t mean it goes live at once: every trace is reviewed.
05
Manage the result from your email
In «Mis rastros» (my traces), request access with the email you used to send it. Check its status, fix whatever you’re told if it’s rejected, and choose whether it also appears in the list or is only found while walking. Check the renewal: it’s planned to last one year, and the current conditions are in the rules.
If something doesn’t go as expected
I’ve paid and can’t see it
Check in «Mis rastros» whether it’s awaiting review, and check your email. If it’s already published, zoom in on its location: not all of them appear in the list.
I have a coupon
Enter it in the «Cupón» field before sending. With a valid coupon nothing is charged, but the trace is still reviewed. If the code isn’t valid or has run out, the form tells you before sending and doesn’t charge anything behind your back.
When you finish
You’ll understand how to discover a trace and how to send yours for review.
Check you’ve got it
I’ve chosen a spot related to my story.
I’ve read the rules and know where to check the status.
Guide on the web: /en/manual/descubrir-rastros
I want to explore
Take InfoMapa on your phone
Find the controls, change the theme and add a shortcut to the website.
Before you start
Open the website in your phone’s browser. Using the map and updating data needs a connection.
Get ready
Follow the steps
Check
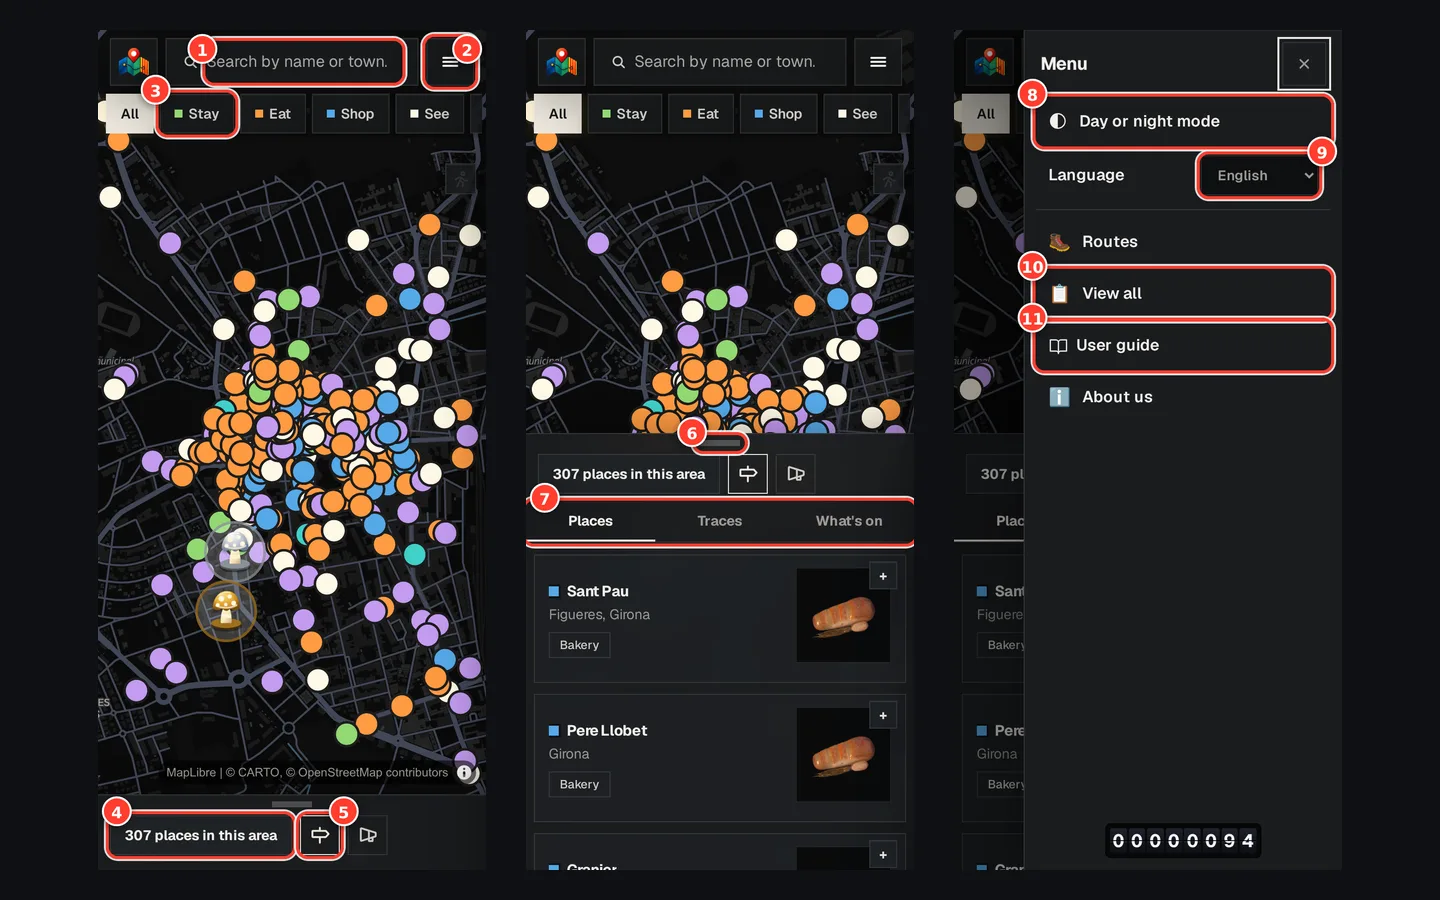
Real screenshot of the tool. On a phone: the map, the list in the bottom sheet and the ☰ menu. Details and prices may change.
Search, always at the top.
☰ menu: language, day or night, directory and guide.
Categories: slide them sideways.
The bottom sheet: tap it or drag it up to see the list.
Routes and Advertise here icons (hold your finger on one to see its name).
The handle: drag it to raise or lower the sheet.
Places, Traces and What’s on, as on a computer.
Day or night mode.
Language.
View all: the whole directory as a list.
User guide.
Step by step
01
Search and filter from the top
The search box is always at the top. Below it, the categories slide sideways; «Filters», at the end of the row, opens the other options. The ☰ button on the right opens the menu.
02
The list is in the bottom sheet
At the bottom there’s a folded sheet with the number of places in the area. Tap it or drag it up by its handle: you’ll see the list and the Places, Traces and What’s on tabs. Drag it down to go back to the map. Next to it are the Routes and Advertise here icons (and the one for leaving a trace when you zoom in): hold your finger on one to see its name.
03
Choose language and light
The ☰ menu has «Day or night mode» and the language (Catalan, Spanish, French and English), plus routes, the directory and this guide. The browser remembers your choice when storage is available.
04
Add the website to your home screen
Open your browser’s menu and look for the option to install the app or add to home screen. The name and availability of this option depend on the browser. On iPhone it’s usually in Safari’s Share menu.
05
Get ready before you go
Save your route’s link and check the addresses. Adding a shortcut doesn’t download all the maps or turn the website into an offline map. If you lose your connection, reconnect to load new places and maps.
If something doesn’t go as expected
I can’t find the install option
You can keep using the website as normal or create a bookmark. Not all browsers offer installation in the same way.
When you finish
You’ll know how to use the compact layout and get back to InfoMapa from your home screen.
Check you’ve got it
I know how to raise and lower the list sheet.
I know where the ☰ menu is.
I’ve saved my route’s link outside the browser.
Guide on the web: /en/manual/usar-en-movil
I want to explore
Language, day or night mode and keyboard use
Choose the language, switch between sun and moon and use the site without a mouse.
Before you start
These settings are saved in your browser. You don’t need an account.
Get ready
Follow the steps
Check
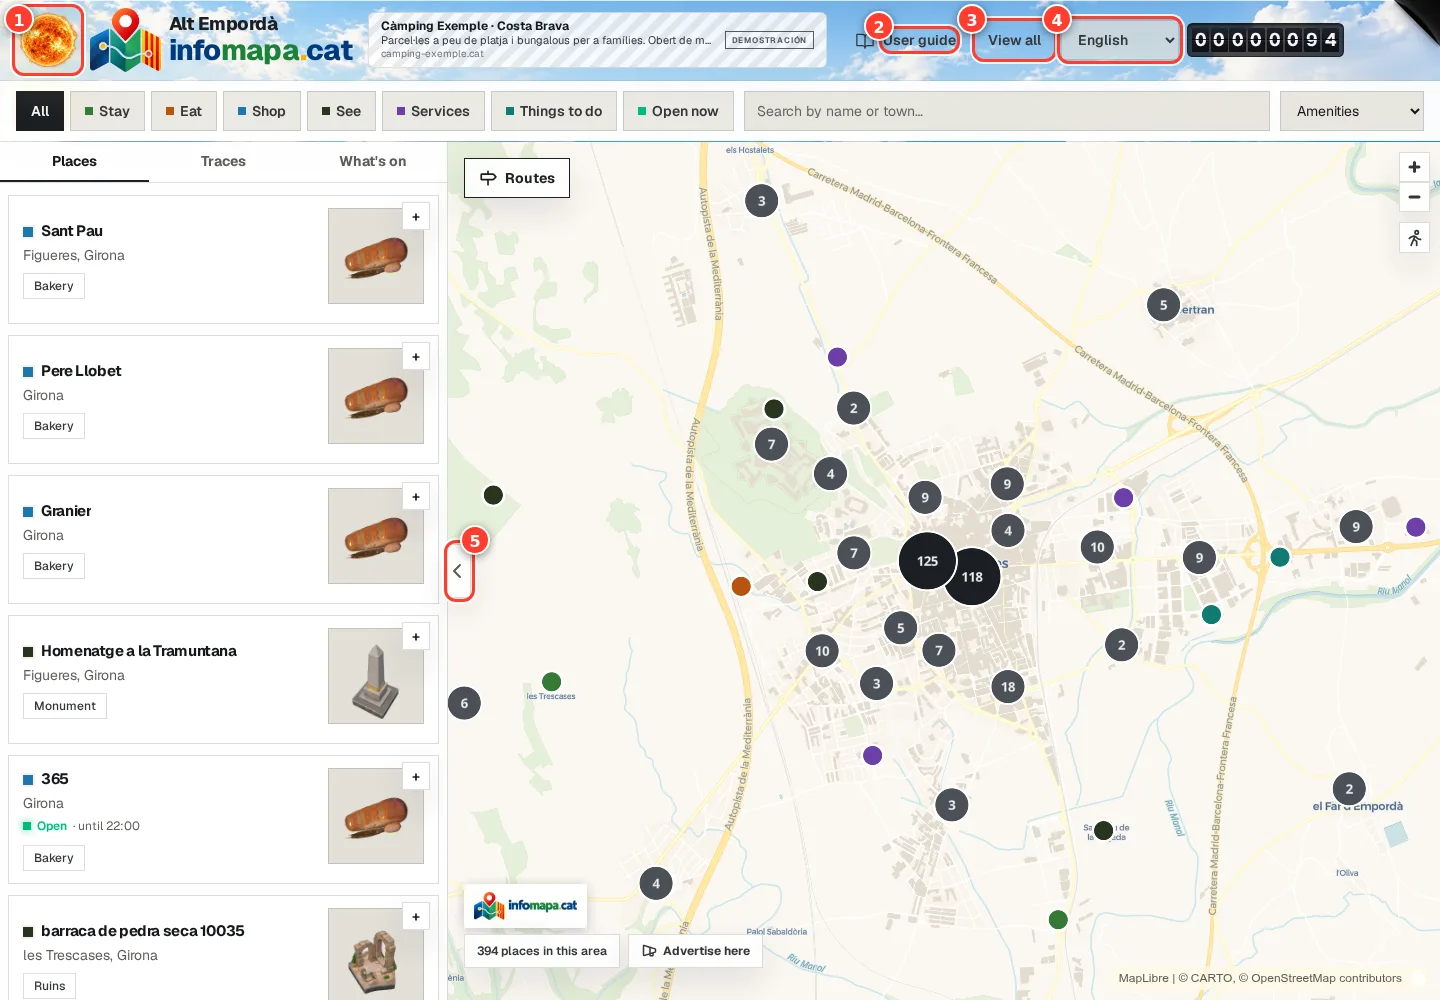
Real screenshot of the tool. In day mode the map and header turn light. Details and prices may change.
The sun or moon: switches between day and night mode. It’s remembered for next time.
User guide.
View all: the directory as a list.
Language: català, castellano, français or English.
Fold the list away to see more map.
Step by step
01
Change the language
Use the selector in the header: català, castellano, français or English. The page you’re viewing opens in the chosen language and the address changes (/ca, /es, /fr, /en). The browser remembers it for a year, so next time you’ll land in your language. This guide is also available in all four languages.
02
Choose day or night
On a computer, click the sun or moon at the top left, next to the logo (it’s a button, even if it looks like decoration). On a phone, it’s in the ☰ menu as «Day or night mode». Night mode uses a dark map and day mode a light one, with the header sky to match. Your choice is saved in this browser.
03
Get around with the keyboard
Tab moves through buttons, links and fields; Enter or the space bar activates them. With the map selected, the arrow keys move it and the + and − keys change the zoom.
04
Close what opens on top
Escape closes a trace or an event opened on the map. If you had a photo full screen, the first Escape closes the photo and the second, the trace.
05
Adjust the size
If you need bigger text, use your browser’s zoom (Ctrl and + on a computer, or pinch on a phone). The page rearranges itself for narrow screens without losing features.
If something doesn’t go as expected
Night mode comes back every time I visit
The theme is saved in the browser. In private browsing, or if you clear the site’s data, it’s lost when you close it.
Some text is still in Spanish
Payment form messages and some management screens (the trace form, the client area and the sales area) are in Spanish in every language.
When you finish
You’ll have the site in your language, looking the way you like, and know how to get around with the keyboard.
Check you’ve got it
I’ve changed the language and the theme.
I’ve closed a panel with the Escape key.
Guide on the web: /en/manual/idioma-y-apariencia
I want to explore
Answers to the most common questions
The questions first-time visitors ask most, and what to do if something goes wrong.
Before you start
Work out what you were trying to do, on which screen and what message appears.
Get ready
Follow the steps
Check
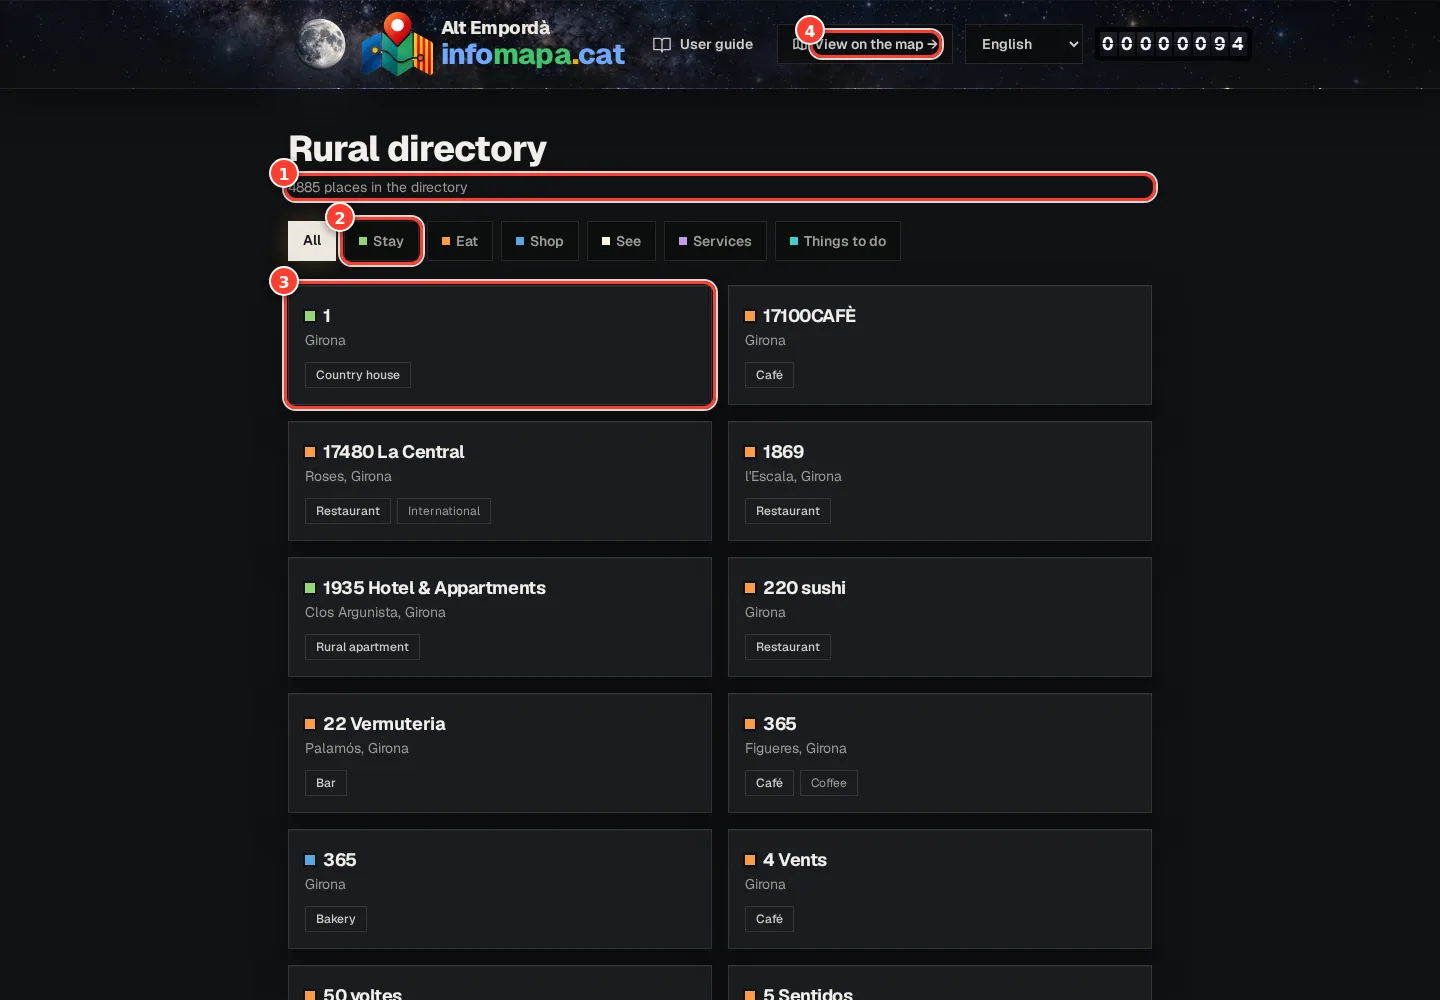
Real screenshot of the tool. «View all»: the directory as a list, in case the map doesn’t find something for you. Details and prices may change.
How many places there are in total.
Categories, as on the map.
Each place, with its town and type: tap it to open the listing.
View on the map: back to the map.
Step by step
01
On my phone I can’t see the list of results
It’s in the bottom sheet, folded away to leave room for the map. Tap «N places in this area» or drag the handle up. The Traces and What’s on tabs are there too.
02
What’s a trace? And a figure or a mushroom?
A trace is a text, photo, video or recording that someone has pinned to a spot on the map. Figures are the 3D drawings of each place. A gold or silver mushroom is a business that pays to stand out. All of the site’s own words are in «InfoMapa’s own words».
03
How much does it cost to leave a trace or advertise?
Looking is free, and so is completing your business listing. Leaving a trace, highlighting a listing or placing a ground logo has a yearly price shown on the screen before you pay. Prices rise with the site’s visits: what you pay today lasts you all year.
04
I can’t find «Leave something here» or «Advertise here»
They appear when you zoom in on the map: with half a county on screen it makes no sense to pin anything. On a phone they’re icons next to the number of places (hold your finger on one to see its name). They also appear when you right-click, or hold your finger still for a second, on a spot on the map.
05
I searched for a village and the map didn’t go there
The search box filters what’s in the area you’re viewing; it doesn’t take you somewhere else. Zoom out until you can see the village, or drag the map there, and search again.
06
How do I switch to night mode or change language?
On a computer, the sun or moon at the top left switches the mode, and the drop-down in the header changes the language. On a phone, both are in the ☰ menu. This guide is also available in all four languages.
07
What’s the number at the top?
The website’s visit counter. Prices are based on it: the more visits, the more it’s worth being there.
08
If the map is empty or won’t load
Clear the filters, switch off «Open now» and zoom out. If the map tiles fail, check your connection and press «Try again» when it appears. If your browser can’t display the map, use «View all» and the listings.
09
If the sign-in email doesn’t arrive
Check the address is right, look in your spam folder and wait a few minutes before trying again. Use the right door: client area, sales area, my traces or my ads. If the link has expired (they last half an hour) or was already used, request a new one.
10
If a file won’t upload
Check the format and size shown by the field: a listing photo, a trace image and a ground logo have different limits. Shrink or export the file in an accepted format and wait for the upload to finish before sending.
11
If a payment or publication seems stuck
Check the status in your area and the confirmation email. A new trace or logo is reviewed after payment. If you see «demo», no real charge was made. Don’t buy again without first checking the status of the first attempt.
12
If you need the team to look into it
Have ready the page address, the name of the place or ad, the steps you followed, the error message and a screenshot without private data. For payments, keep the receipt. Don’t share sign-in links or card details.
If something doesn’t go as expected
I don’t know which path to follow
Exploring the map: I want to explore. Editing an establishment: I have a business. Managing a sales portfolio: I’m a sales rep. Creating a campaign or a logo: I want to advertise. You can switch path at any time.
When you finish
You’ll be able to try a specific solution or explain the problem with the information needed.
Check you’ve got it
I’ve checked the solution for my case.
I have the link and the error message if I need help.
Guide on the web: /en/manual/resolver-problemas
I have a business
Claim your business listing
Find your establishment and sign in by email, without creating a password.
Before you start
Find your business listing and have access to the email you want to manage it with. The client area screens are currently in Spanish.
Get ready
Follow the steps
Check
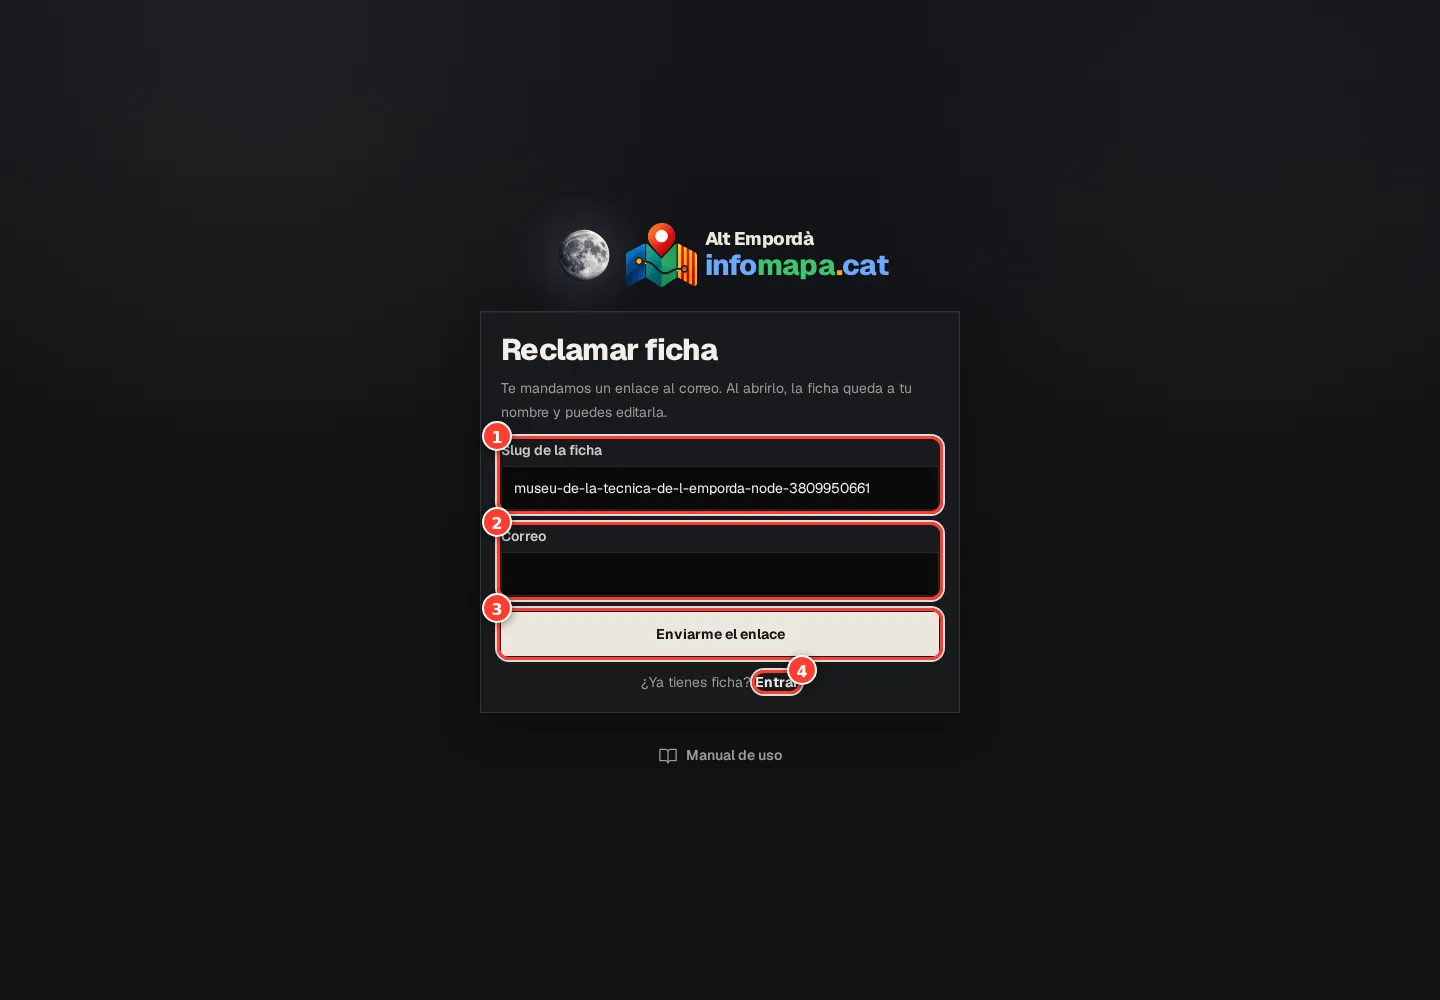
Real screenshot of the tool. You get here from «¿Es tu ficha? Reclámala» on the listing itself. Details and prices may change.
The listing you’re claiming (filled in from the listing).
Your email: the link arrives there.
«Enviarme el enlace»: it expires after half an hour and works only once.
Already have a listing? «Entrar» (sign in).
Step by step
01
Find your establishment
Use the map’s search box to find it by name or town. You can also browse the directory’s categories. Many listings come from public information, so yours may already exist. Check the address so you don’t claim a business with a similar name.
02
Open the claim option
At the bottom of the listing, press «¿Es tu ficha? Reclámala y autoedítala» (is this your listing? claim it). «Reclamar ficha» opens with your listing already filled in (the identifier field, or «slug», comes pre-filled: don’t change it). If you go straight to the client area, open «Es la primera vez y quiero reclamar mi ficha» and copy the last part of your listing’s address.
03
Request your access link
Type your email and press «Enviarme el enlace» (send me the link). Check your inbox and spam folder. Opening the form doesn’t assign the listing to you: you must complete access from the message you receive.
04
Confirm your sign-in
Open the link in the email and press «Entrar». It can be used once and expires after 30 minutes. To come back another day, request a new link with the same email. If you manage several listings with it, you can choose which one to edit.
If something doesn’t go as expected
The link has expired or was already used
Go back to the client area and request a new one. Don’t forward your sign-in link: it gives access to your account.
What if someone else claims my listing?
To claim it, they have to open the link sent to their email, and every change is recorded in a history. If someone takes your listing with false details, the directory team or your sales rep can remove their access, undo their changes, lock claims and give access to you.
The listing doesn’t exist or belongs to someone else
Don’t claim a similar listing. Contact whoever runs the directory to sort out the listing or its ownership.
When you finish
You’ll be able to enter the client area and start completing your listing.
Check you’ve got it
I’ve checked the business name and address.
I’ve signed in from the right email.
Guide on the web: /en/manual/reclamar-ficha
I have a business
Turn your listing into a good introduction
Complete the details that help people decide: photo, hours, contact and amenities.
Before you start
Sign in to the client area (its screens are currently in Spanish). Completing a listing’s basic information is free.
Get ready
Follow the steps
Check
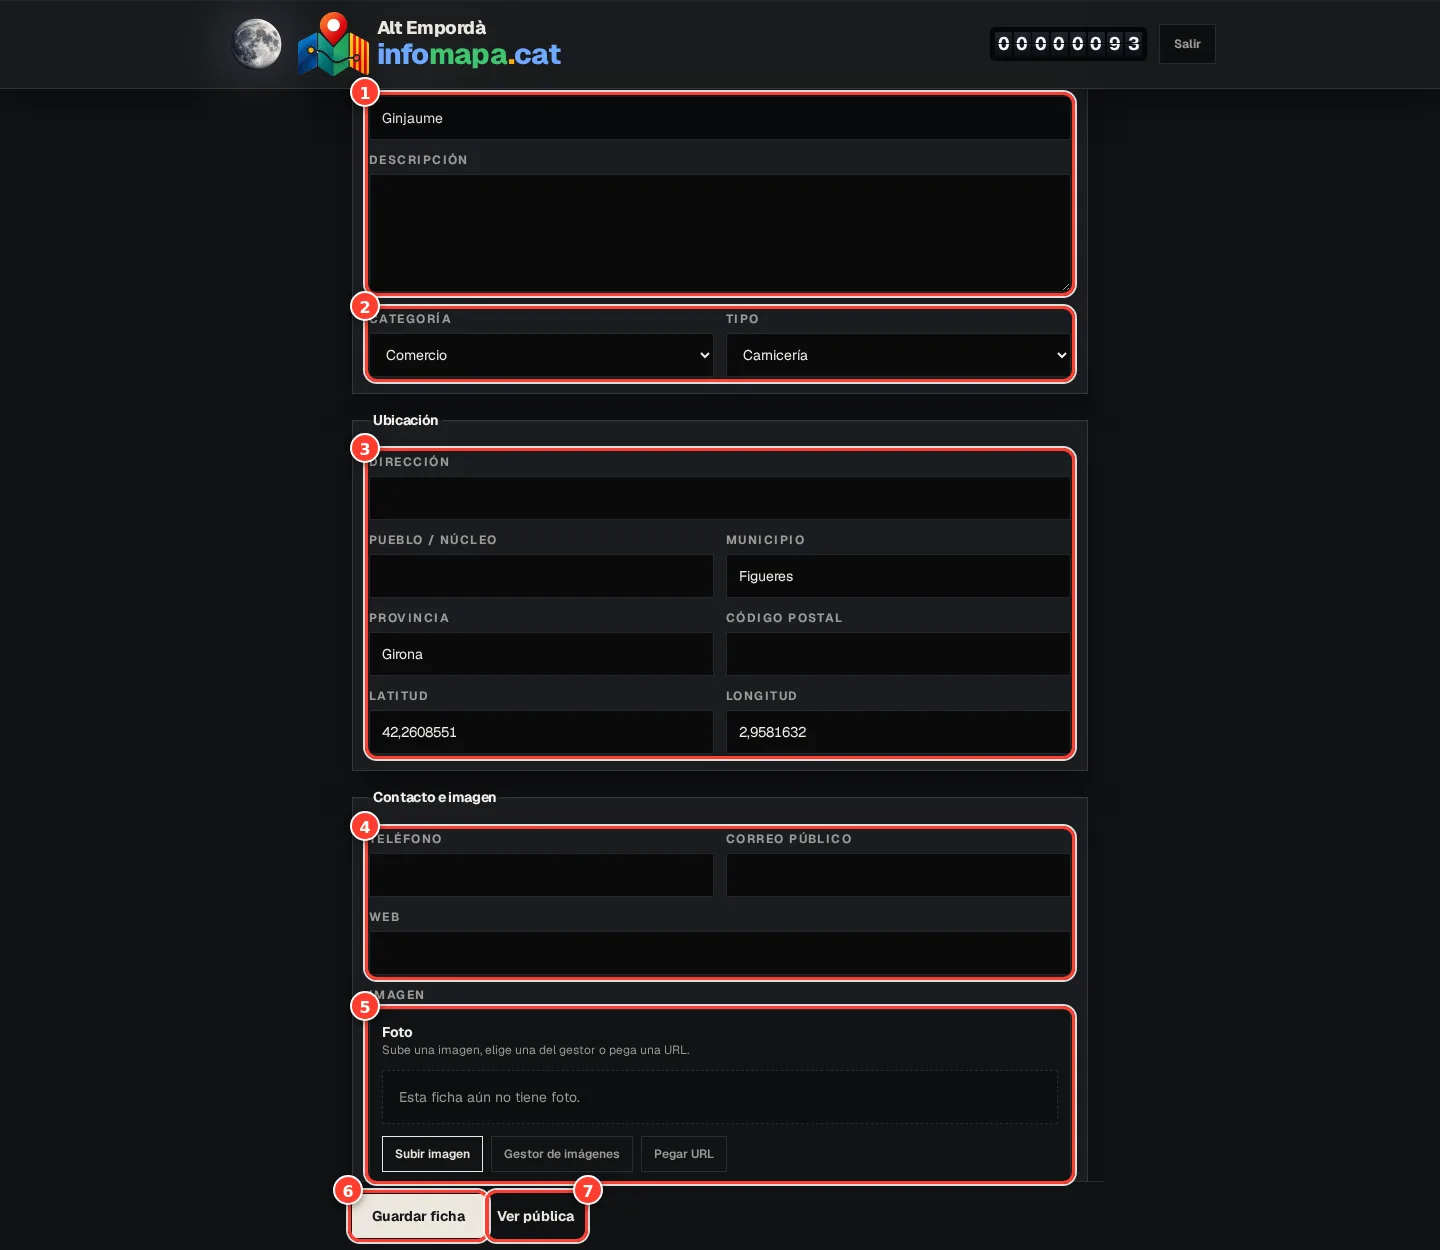
Real screenshot of the tool. Your listing’s form: the same as the visitor sees, but for writing it. Details and prices may change.
Name and description: the first things people read about your business.
Category and type: they decide the figure and colour you get on the map.
Location: address, town and the exact point (latitude and longitude).
Phone, email and website: what can be tapped from the listing.
Photo: upload it, pick it from the library or paste an address.
«Guardar ficha»: always at the bottom, within reach.
«Ver pública»: your listing as anyone sees it.
Step by step
01
Check the main details
Check the name and write a specific description: what you offer, where you are and what a first-time visitor should know. Choose the category and type that best describe your business.
02
Check the location
Review address, village, town, province, postcode, latitude and longitude. They are form fields: afterwards, check on the map (with «Ver pública», view public listing) that the coordinates point to the right place before calling it done.
03
Make it easy to get in touch
Add phone, public email, website and opening hours. The public email is the one visitors will see. For opening hours, follow the field’s format; a vague description can stop «Open now» from working.
04
Upload an image and complete the specifics
Choose your own or an authorised photo that is sharp and representative. JPEG, PNG, WebP or AVIF up to 5 MB are accepted. Tick the amenities you really have; for accommodation check guests, bedrooms, bathrooms and price per night, and for restaurants the type of cuisine.
05
Save and check the public listing
Press «Guardar ficha» (save listing, always at the bottom) and wait for the confirmation. Then open the listing as a visitor: check phone, website, image and position. Repeat this check whenever your hours, season or amenities change.
If something doesn’t go as expected
I changed a field but it doesn’t show
Make sure you saved and that the form didn’t show an error. Reopen the public listing. If you manage several businesses, check which one was selected.
When you finish
Your business will have useful information that matches what it offers today.
Check you’ve got it
The photo represents the business and I have permission to use it.
Opening hours and contact details are up to date.
I’ve saved and checked the public listing.
Guide on the web: /en/manual/editar-negocio
I have a business
Make your business stand out and understand renewal
Tell the free listing apart from visibility plans and check today’s price.
Before you start
Open your listing and check the plans section. The valid price is the one shown on the purchase screen.
Get ready
Follow the steps
Check
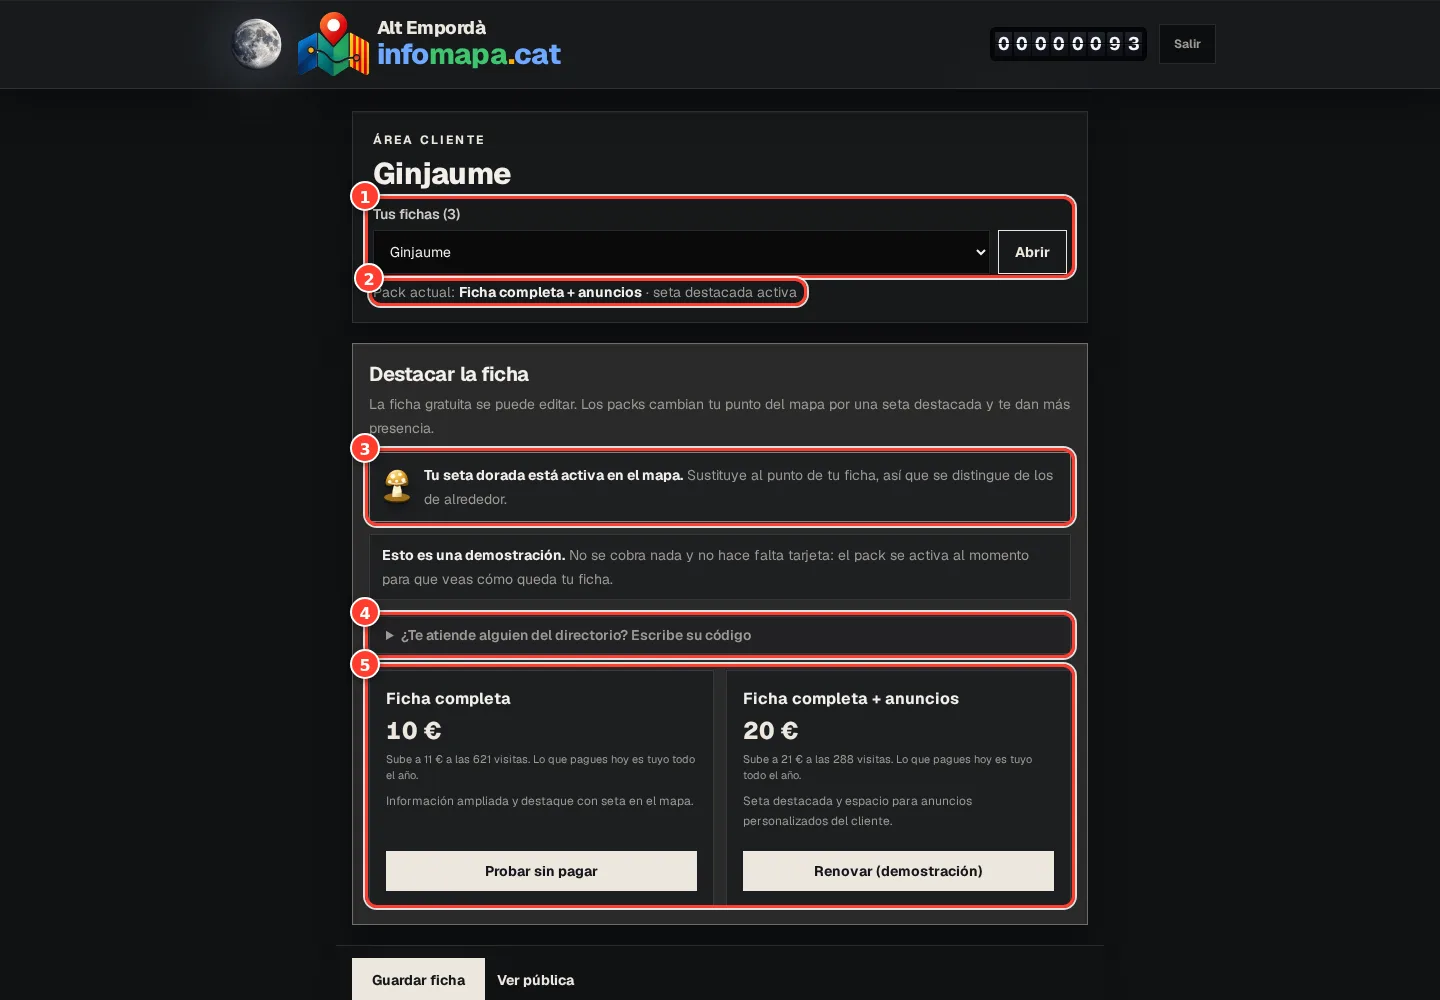
Real screenshot of the tool. Your packs, what you have now and what each one costs today. Details and prices may change.
Your listings: if you manage several, choose here which one to edit.
The pack you have now.
Your highlighted mushroom, if it’s active.
Is someone from the directory helping you? Enter your sales rep’s code.
The two packs, with prices. The price rises with visits: what you pay today lasts you all year.
Step by step
01
Start from the free listing
The free listing lets you keep your information up to date and appear as a normal marker. You don’t need a plan to complete your establishment’s basic details.
02
Compare visibility
«Ficha completa» (full listing) adds a silver mushroom to stand out on the map. «Ficha completa + anuncios» (full listing with ads) adds a gold mushroom and your own ad inside your listing. That ad isn’t a campaign in other spaces or a ground logo.
03
Check the price before you pay
Plan prices change with the directory’s visits. The screen shows today’s price and the next step up. Plans are yearly; the price you pay covers that period even if the counter goes up later.
04
Check the code and the confirmation
If a sales rep helped you, enter their code in the optional field and check it before paying. It doesn’t change the price. Follow the payment process and make sure your plan is active. A demo-mode message means no real charge was made.
05
Keep an eye on the expiry date
Check your plan’s status in your listing. The system is set to warn you 15 days before it expires, with a 7-day grace period. If you don’t renew, you go back to free visibility; your listing’s information is kept.
If something doesn’t go as expected
I’ve paid and I’m still on the old plan
Wait for the payment confirmation and reopen your listing. If it persists, keep the receipt and contact the team before buying again.
When you finish
You’ll be able to choose a plan knowing what changes and how long it lasts.
Check you’ve got it
I know what the chosen plan includes.
I’ve checked the price and how long it lasts.
I know where to check the expiry date.
Guide on the web: /en/manual/planes-y-renovacion
I have a business
Look after comments and your own ad
Manage participation on your listing and publish a promotion if your plan includes it.
Before you start
Sign in to the client area. Comments and your own ad are managed in separate sections.
Get ready
Follow the steps
Check
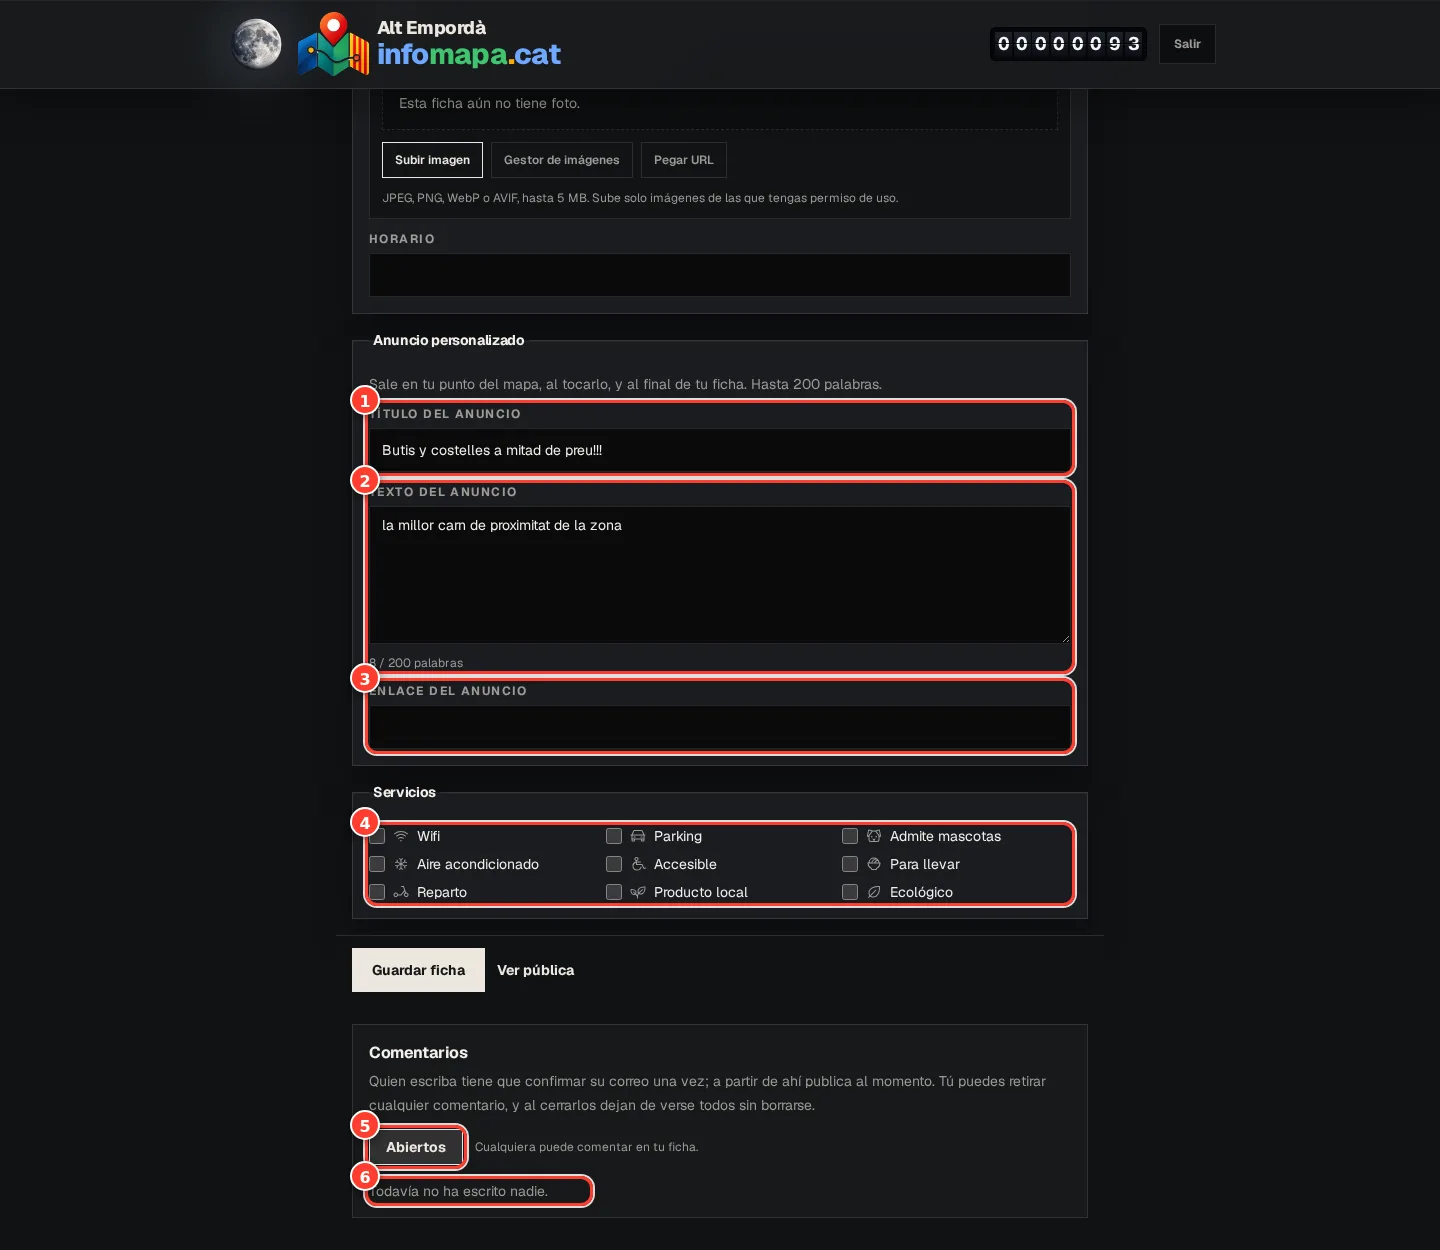
Real screenshot of the tool. Your listing’s ad and the comments, at the end of the client area. Details and prices may change.
Ad title: it appears when someone taps your marker on the map and at the end of your listing.
Ad text, up to 200 words (the counter is below).
Ad link: to your website, your shop or an offer.
Amenities: tick the ones you have; they’re used by the map filters.
Comments open or closed: closing them hides them all, without deleting them.
Comments appear here, with a button to remove any of them.
Step by step
01
Decide whether you can look after comments
Comments start closed. Turn them on from their section when you can review them. The switch works straight away and is separate from the business details form.
02
Review participation
To write, a person confirms their email. Comments must be between 10 characters and 150 words. From the management area you can remove comments from your listing.
03
Close them for a while if you need to
When you close comments they stop showing, but they are kept. If you reopen them, the ones you haven’t removed may show again. Closing and deleting are not the same thing.
04
Prepare your own ad
With «Ficha completa + anuncios» you can edit a headline, a text of up to 200 words and a link. Explain a specific offer, how long it lasts and what happens when the link is opened. Save and check how it looks on your listing.
If something doesn’t go as expected
I can’t see the ad editor
Check that the selected listing has the plan with ads active. The free listing and the silver plan don’t include that editor.
When you finish
You’ll know how to open or close comments and keep a useful promotion on your listing.
Check you’ve got it
I’ve decided whether to keep comments open.
My promotion has a clear link and end date.
Guide on the web: /en/manual/comentarios-y-promocion
I’m a sales rep
Start your day as a sales rep
Sign in, find your code and understand the five sections of your area.
Before you start
The team must have registered you as an active sales rep. Use the email linked to your profile. The sales area is currently in Spanish.
Get ready
Follow the steps
Check
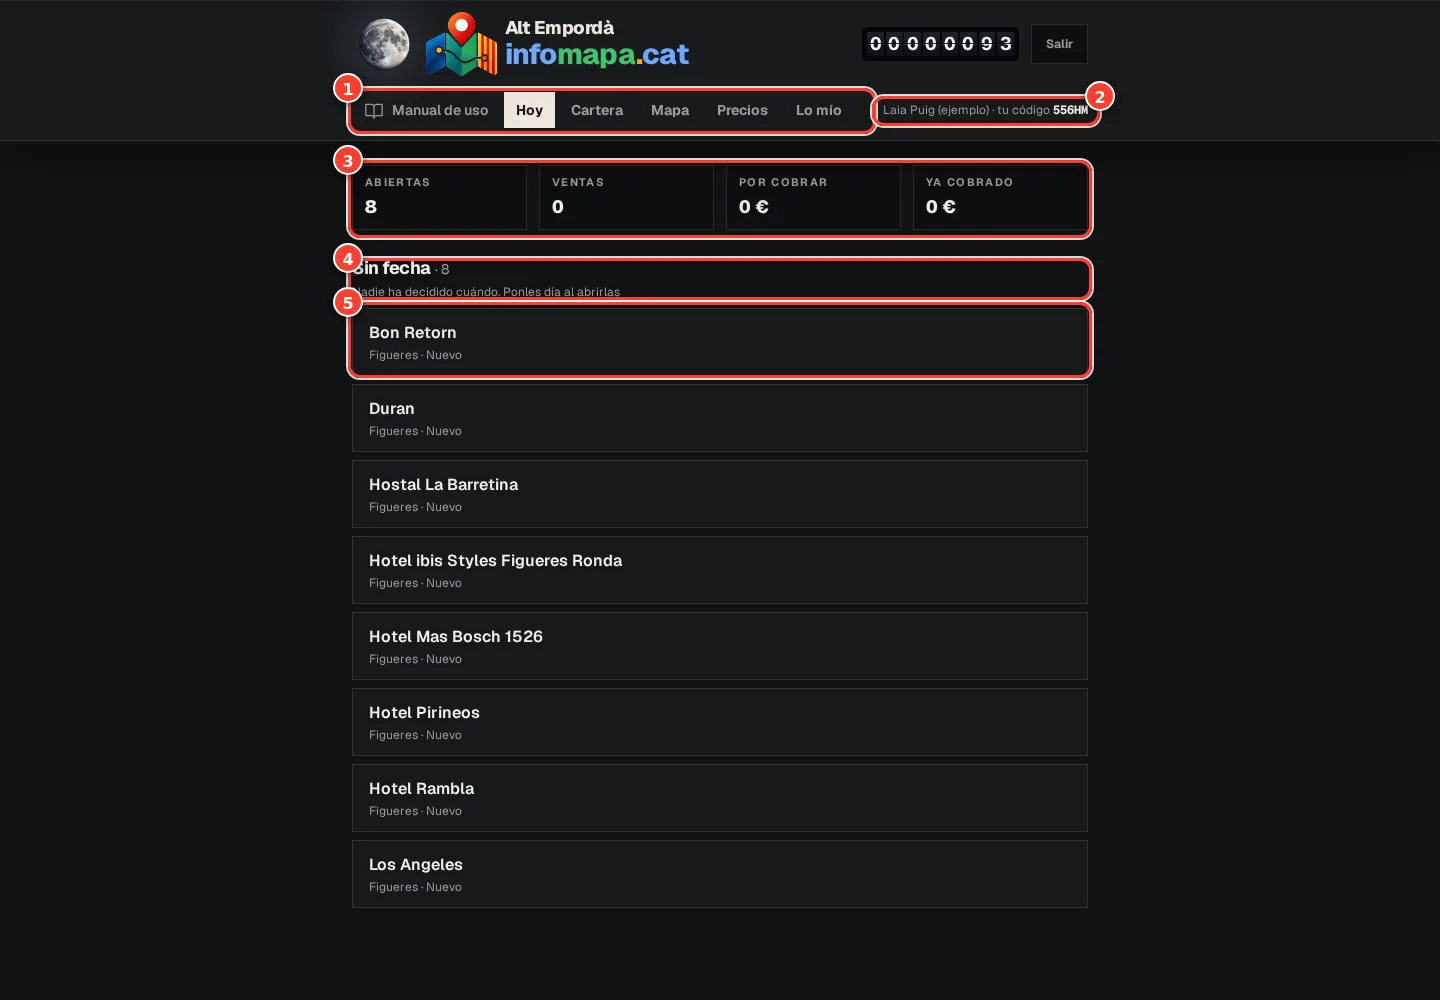
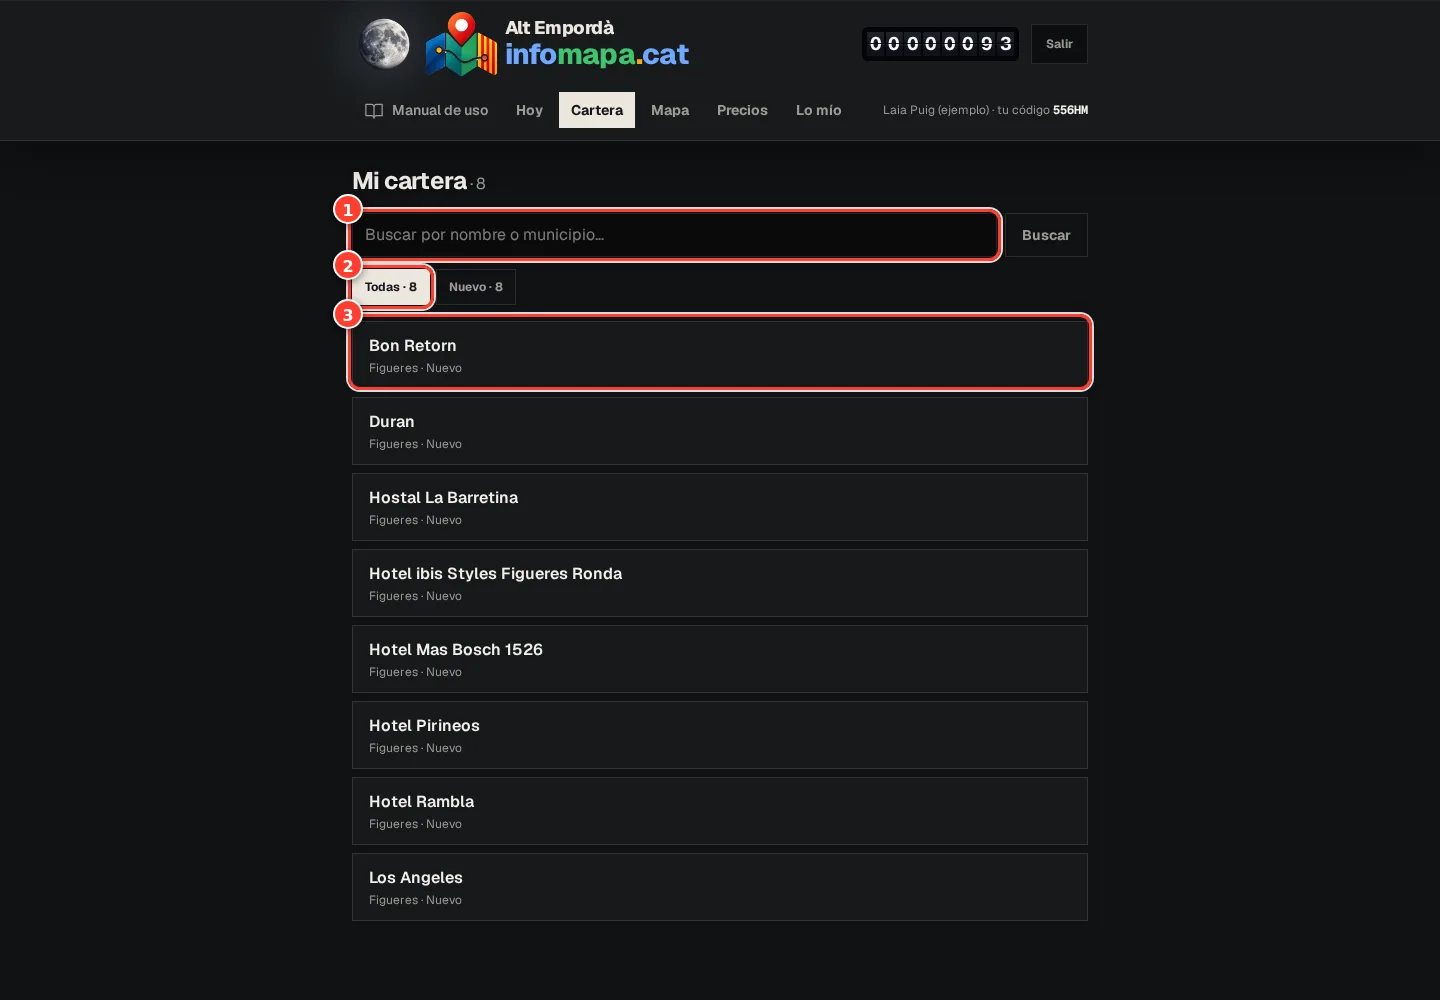
Real screenshot of the tool. Your first screen: today’s agenda and your code. Details and prices may change.
The tabs: Hoy, Cartera, Mapa, Precios and Lo mío.
Your name and your sales-rep code.
How you’re doing: open listings, sales, to be paid and already paid.
Today’s agenda, in groups: overdue, for today, no date and later.
Each listing, with its town and status: tap it to work on it.
Step by step
01
Request access to your area
Open the sales area, type your email and request the link. There’s no password and no public sign-up for sales reps. If you’ve just joined, check with the team that your account is ready.
02
Sign in from the message
The link lasts 30 minutes and works once. Open it and confirm «Entrar». If it expires or your session ends, request a new one. Check your spam folder if it doesn’t arrive.
03
Find the sections and your code
«Hoy» (today) organises your next actions; «Cartera» (portfolio) gathers your listings; «Mapa» shows where they are; «Precios» gives current prices; «Lo mío» (mine) sums up your commissions. Your code appears in the header.
04
Start with your agenda
Deal first with «Atrasadas» (overdue), then «Para hoy» (for today). Review «Sin fecha» (no date) to decide when to act; «Más adelante» (later) holds what already has a future date. If your portfolio is empty, the team needs to assign you listings.
If something doesn’t go as expected
I get the message but can’t sign in
Request a new link and check with the team that your profile is still active. A paused sales rep loses access.
When you finish
You’ll know where to start and where to find your portfolio, prices and commissions.
Check you’ve got it
I know where to find my code.
I’ve reviewed what’s overdue and what’s planned for today.
Guide on the web: /en/manual/acceso-vendedores
I’m a sales rep
Keep your portfolio without losing track
Turn every conversation into a status, a note and a next action.
Before you start
You need listings assigned to you. Changes are made in each contact’s sales card.
Get ready
Follow the steps
Check
Real screenshot of the tool. The portfolio: all your listings, with search and statuses. Details and prices may change.
Search by name or town.
Filter by status: all, new, contacted, interested…
Each listing in your portfolio: tap it to see its details, add notes and set the next action.
Step by step
01
Find the contact
Open «Cartera», search by text or filter by status. Use «Mapa» to group visits by distance. Tap a marker or a row to open the sales card.
02
Read before you call
Check the contact details, the history and what’s missing from the public listing. That way you won’t repeat questions or an offer the client has already turned down.
03
Record what happened
After the contact, choose the matching status: new, contacted, interested, visited or lost. Add a specific note; it’s saved with the date and keeps the earlier ones.
04
Leave a next action
Set a date and the reason to come back: «confirm the photo», «review the offer» or «visit after opening». Save. That date automatically puts the listing in the right group in «Hoy».
If something doesn’t go as expected
I can’t mark it as «Ganado» (won)
The sale is confirmed by the payment. The won status and the commission are recorded when the payment is confirmed, not by a manual change from the sales rep.
It doesn’t appear where I expected in the agenda
Check the saved date and whether the contact is still open. The agenda works by day, not by hour.
When you finish
Your agenda will show what to do, when to do it and what happened before.
Check you’ve got it
Every contact I’ve worked on has a status and a note.
I’ve set a date and reason for the next action.
Guide on the web: /en/manual/organizar-cartera
I’m a sales rep
Give a demo the client understands
Show the listing, explain the value of standing out and leave a useful sheet.
Before you start
Open the sales card, check its details and look at today’s prices before talking about amounts.
Get ready
Follow the steps
Check
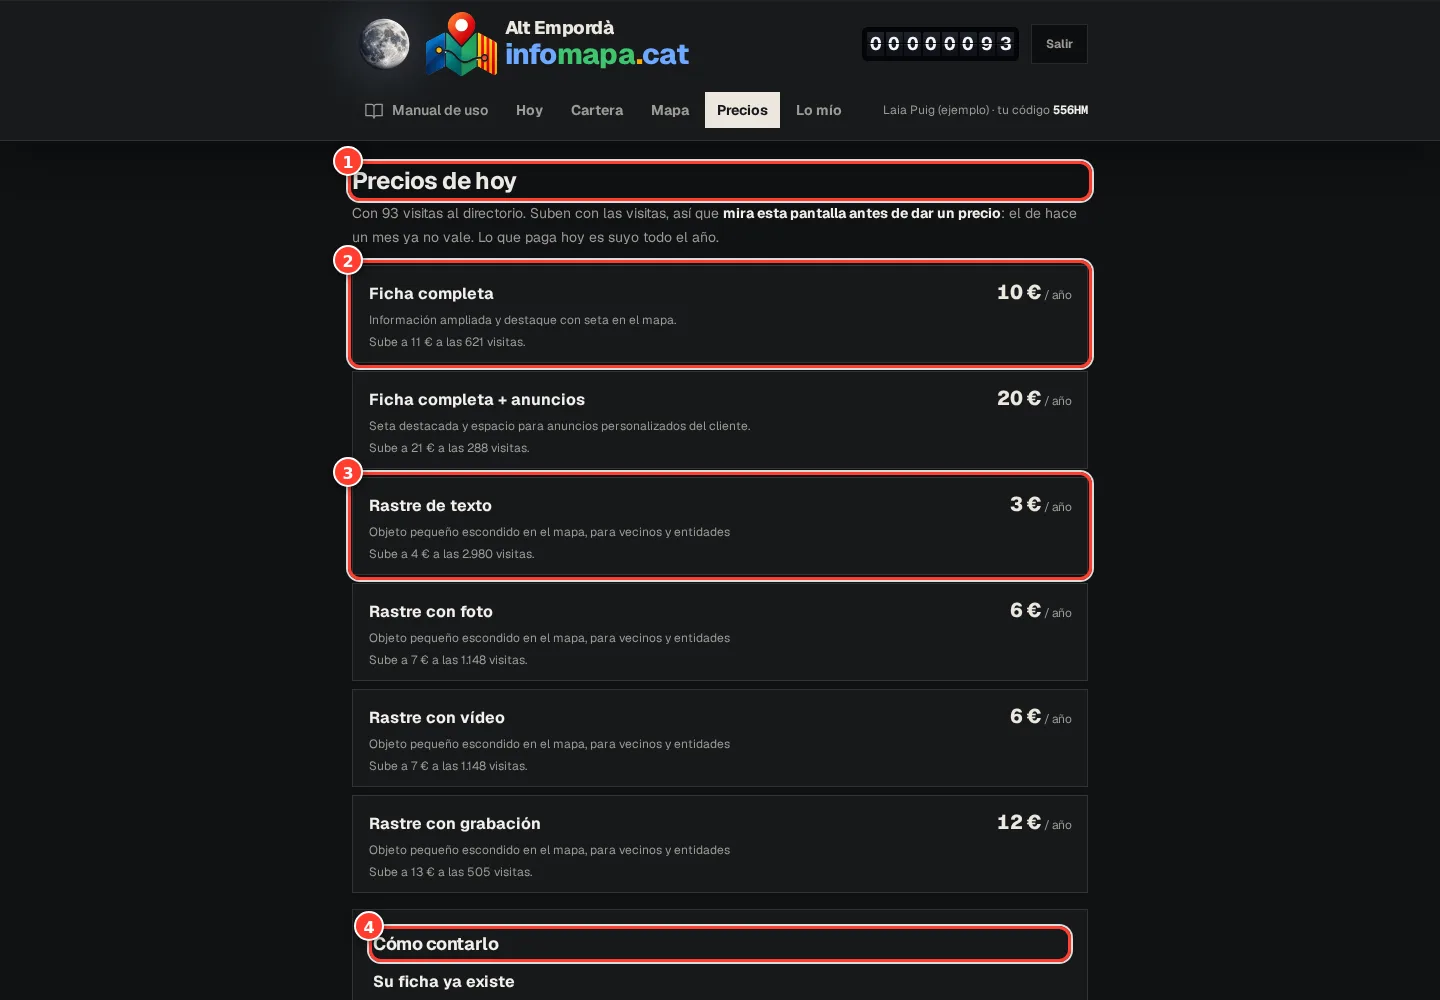
Real screenshot of the tool. Today’s prices, so you never quote an old one. Details and prices may change.
Today’s prices: they rise with visits, so check them before quoting.
Each pack with its yearly price and the number of visits at which it goes up.
Trace prices too.
How to explain it: a script for each case.
Step by step
01
Start with the client’s business
Show their real listing and find it on the map. Point out the details worth completing: photo, hours or description. Explain that completing the basic listing is free.
02
Show a visitor’s journey
Search a category, open the listing and show the phone, website or directions. The goal is for the owner to see what information an interested person gets.
03
Explain exactly what’s being bought
Compare the normal marker, the silver mushroom and the gold one with its own ad. Check «Precios» at that moment. Explain that it lasts a year and that calls, sales or first place in searches are not guaranteed.
04
Make claiming easy
Download the invitation sheet from the sales card. It includes the place and a short address to start the process. You can print it or share the PDF with the client yourself. The owner must use their own email to manage the listing.
05
Close with a specific action
If they’re going to buy, give them your code and check it with them. If they’ll do it later, agree on a date and record it in your portfolio along with a note of the conversation.
If something doesn’t go as expected
The client asks how many sales they’ll get
Explain what can be shown: presence, the space bought and the data available. Don’t turn visits or impressions into promises of customers.
When you finish
You’ll be able to explain the product with a short demo and a clear next step.
Check you’ve got it
I’ve shown the real listing and today’s price.
The client knows how to claim it with their own email.
I’ve agreed and recorded the next step.
Guide on the web: /en/manual/preparar-visita
I’m a sales rep
Your code, your sales and your commissions
Check how a sale is credited and tell pending from settled.
Before you start
Your code is in the header of the sales area. Commission amounts are in «Lo mío».
Get ready
Follow the steps
Check
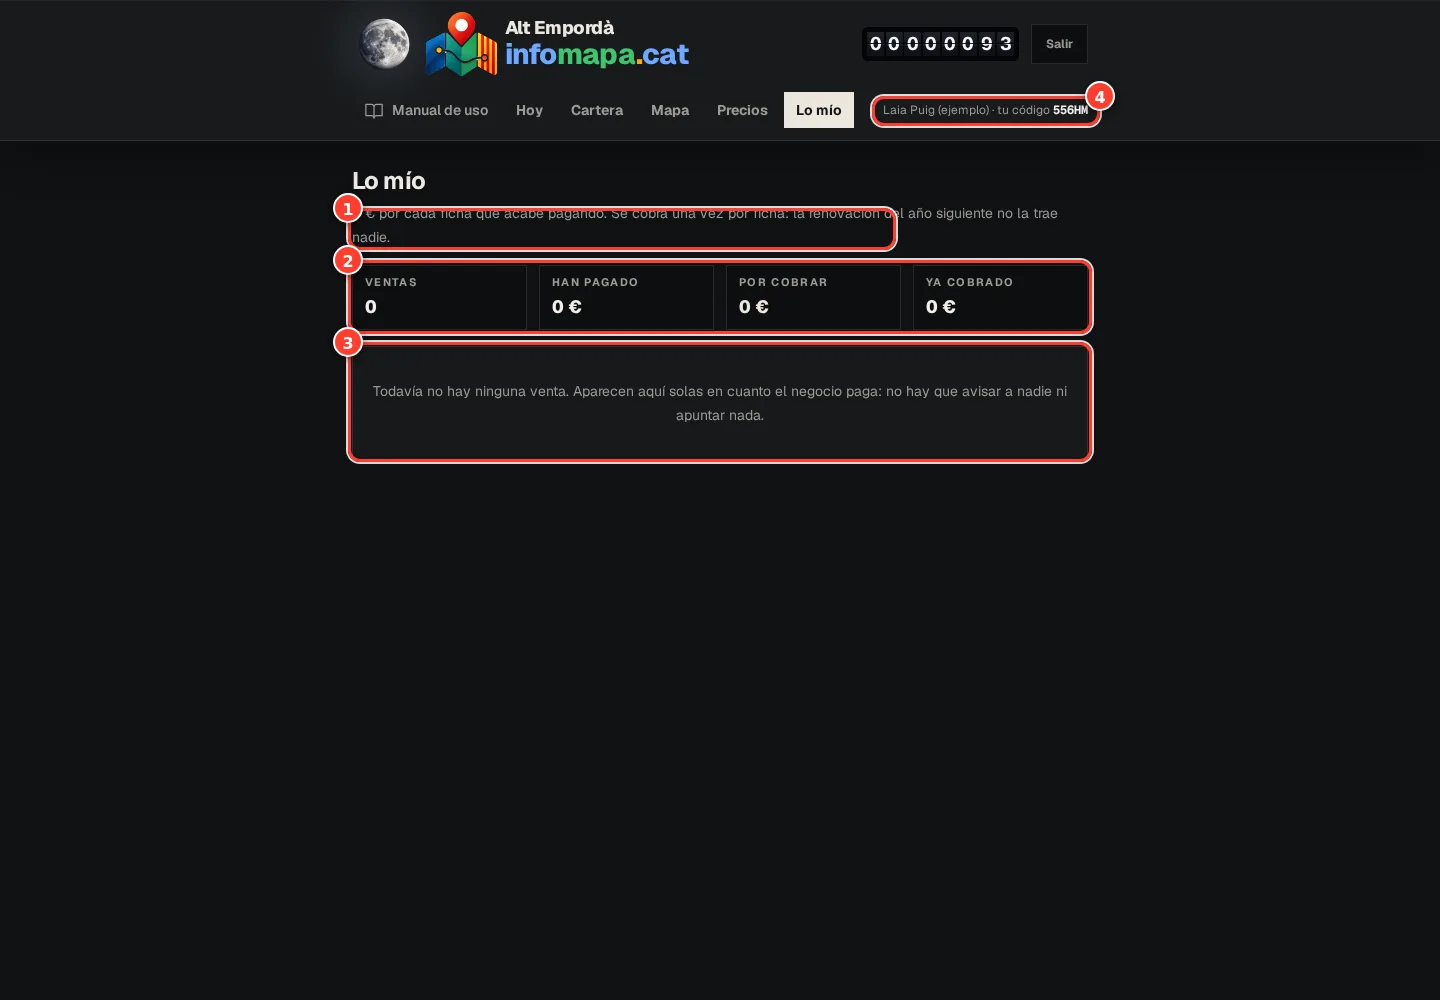
Real screenshot of the tool. What you’ve sold, been paid and are owed. Details and prices may change.
Your commission for every listing that ends up paying.
Sales, what clients have paid, what you’re owed and what you’ve already been paid.
The list of sales: they appear by themselves when the business pays.
Your code, always visible.
Step by step
01
Give your code to the client
Ask them to enter it in the optional field when paying for the plan. The code identifies who helped them and doesn’t change their price. Check the characters before continuing.
02
Understand who gets credited
A valid code can credit you with a sale even if the listing wasn’t in your portfolio. Without a code, the existing assignment is used where it applies. A wrong code may leave the sale without a sales rep and need reviewing.
03
Wait for the payment confirmation
When the payment is confirmed, the listing becomes won and the commission is recorded. You don’t need to change the status by hand or ask for another purchase to make it appear.
04
Check «Lo mío»
See each sale, its date and what’s pending or already settled. Settlement is recorded by whoever runs the directory. One commission is generated per listing; a renewal doesn’t automatically create another.
If something doesn’t go as expected
The client paid and my commission doesn’t show
Check that the payment went through and that your correct code was used. If it still doesn’t appear, ask the team to review it; don’t mark a sale or repeat the payment.
When you finish
You’ll understand when a commission is generated and how to follow its status.
Check you’ve got it
I can explain what my code is for.
I can tell a pending commission from a settled one.
Guide on the web: /en/manual/comisiones
I want to advertise
Choose the right way to advertise
Compare a highlighted listing, your own ad, campaigns and logos on the map.
Before you start
Decide what you want: make your business easier to find, explain an offer or give your brand presence in an area.
Get ready
Follow the steps
Check
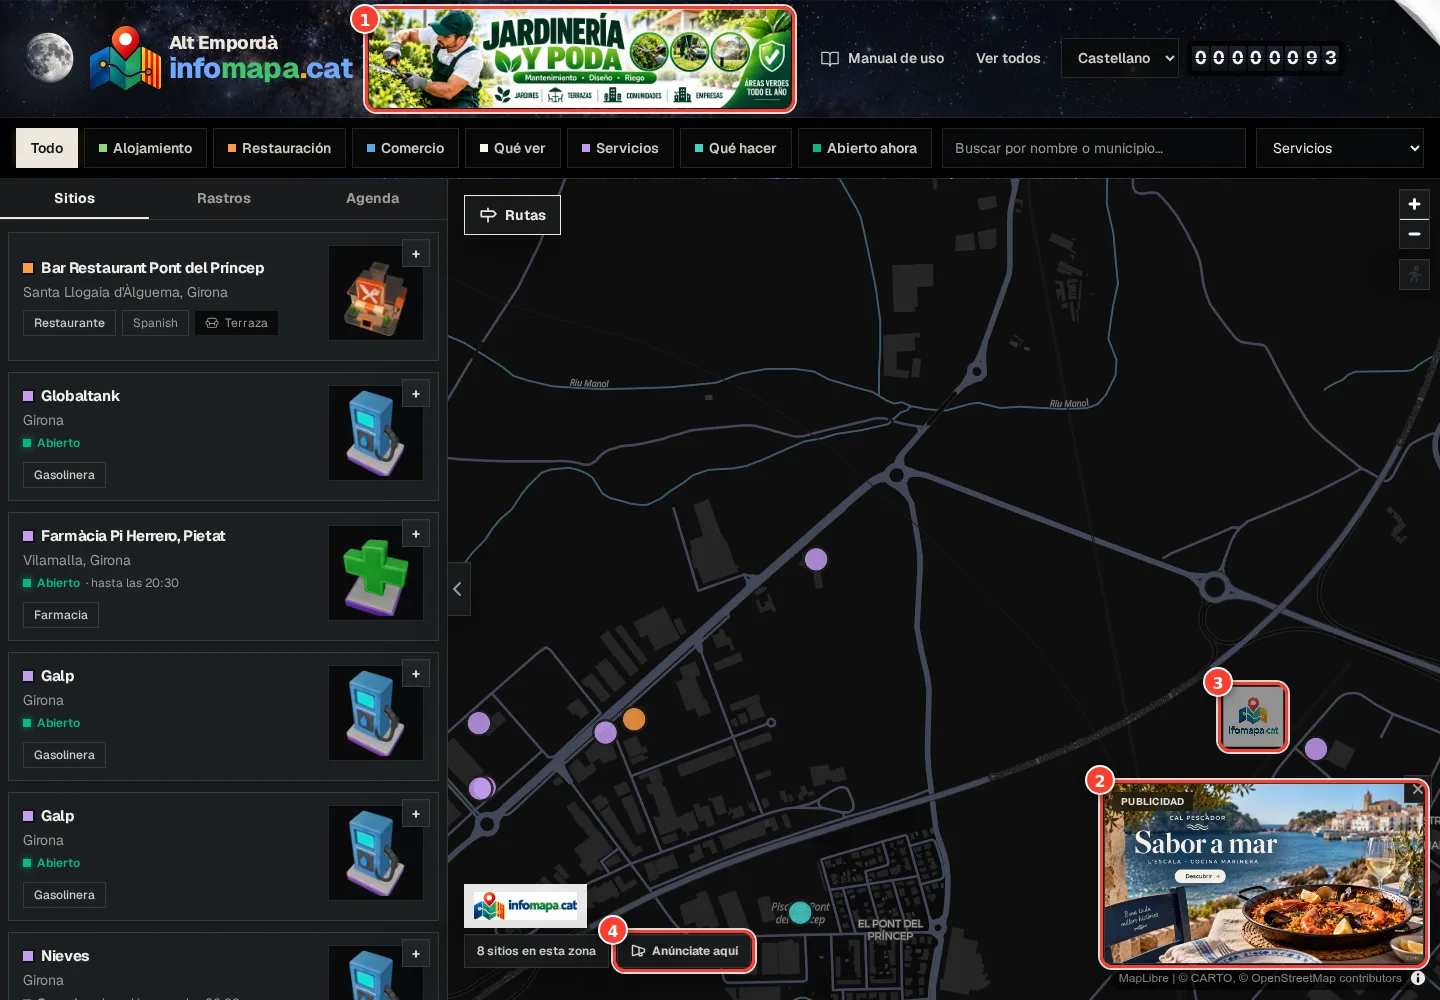
Real screenshot of the tool. Every place you can advertise, on a single screen. Details and prices may change.
Header banner: at the top of every page, rotating between advertisers.
Ad in the corner of the map (and at the end of listings and inside the list on phones). It can be an image or a video.
Ground logo: your brand painted on the map, wherever you choose.
Advertise here: starts a ground logo at the spot you’re looking at.
Step by step
01
So people find your business: look after your listing
Complete the photo, opening hours and contact details first. If you want your marker to stand out, check the listing plans. The basic information can be completed for free.
02
For an offer inside your listing: your own ad
The «Ficha completa + anuncios» plan includes a text ad with a link inside your listing. You edit it from the client area. It doesn’t take up space on other businesses’ listings.
03
For presence in advertising spaces: a campaign
There are spaces in the header, on the map and at the top or bottom of listings. They accept formats according to their set-up. Campaigns are prepared with the directory team; agree on the space, dates, language, creative and destination link.
04
For a brand tied to an area: a ground logo
The logo is placed on the map to scale, see-through and without a link. You buy it from «Advertise here». The price depends on the area covered, the county and the current rate; it’s reviewed before it goes live.
If something doesn’t go as expected
I have a listing plan and no banner shows on the map
They are different products. The plan with ads adds content inside your listing; campaigns in other spaces and the ground logo are bought separately.
When you finish
You’ll know which product fits your goal and where it’s managed.
Check you’ve got it
I’ve chosen a format based on my goal.
I know whether it includes a link and who manages it.
Guide on the web: /en/manual/elegir-publicidad
I want to advertise
Put your logo on the map, step by step
Prepare the image, adjust its size and send it for review with the price in view.
Before you start
Have your own or an authorised logo of up to 2 MB ready, plus an email you can check. A transparent PNG usually blends in best.
Get ready
Follow the steps
Check
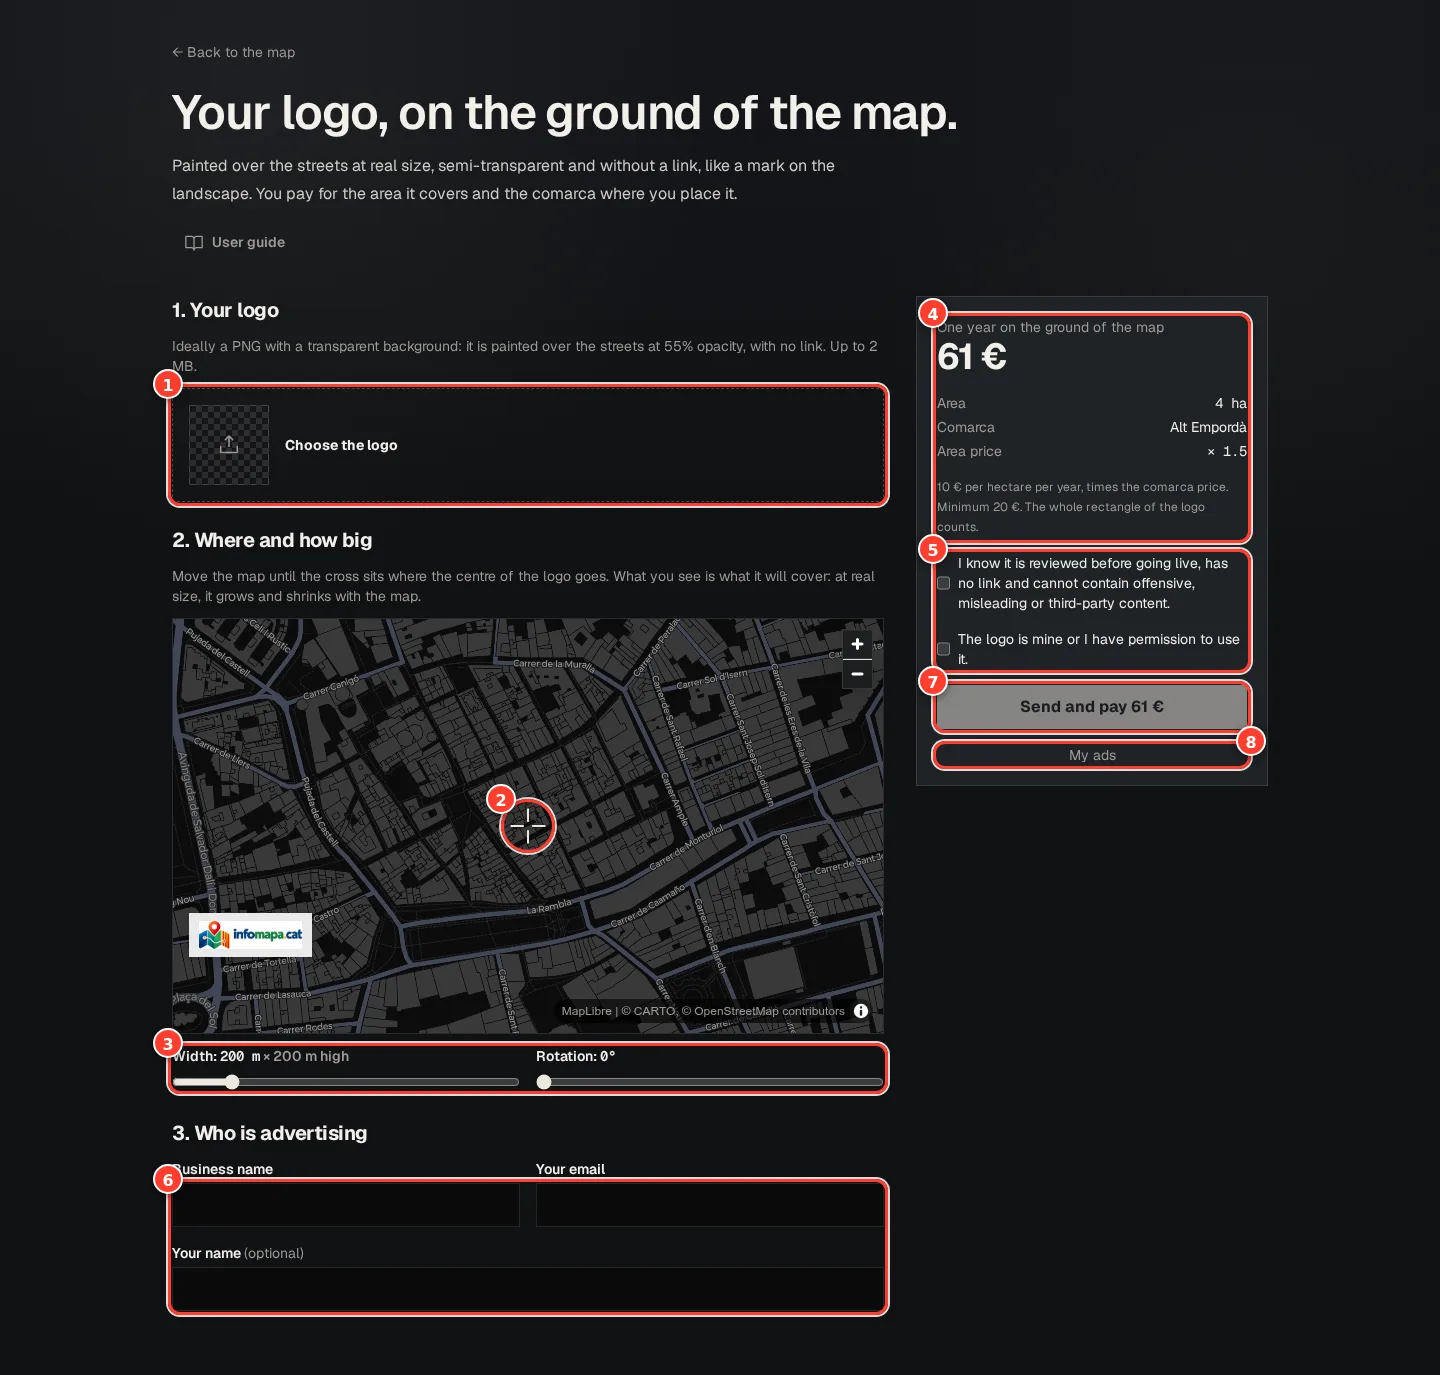
Real screenshot of the tool. The whole form, with the price worked out on the right. Details and prices may change.
Choose your logo: ideally a PNG with a transparent background, up to 2 MB.
The crosshair: move the map until it sits where the centre of the logo goes.
Width and rotation: what you see is what it will cover, life-size.
The price, worked out instantly: area × county price (minimum €20).
The two checkboxes: you accept the review and declare the logo is yours.
Who is advertising: business name and your email (everything arrives there).
Send and pay: the ad goes to review and appears once approved.
My ads: where you see how it’s going.
Step by step
01
Start from the area where you want to appear
Right-click on the map, or press and hold on a phone, and choose «Advertise here». You can also open the form directly. Confirm the chosen spot; don’t accept the starting location unless you picked it.
02
Upload the logo
Press «Choose the logo» and check the preview. Use a clean, legible image without unnecessary personal information. The logo is shown see-through and has no clickable link.
03
Adjust centre, width and rotation
Move the map until the crosshair marks the centre you want. Adjust the width in metres and the rotation. Check the whole rectangle the image takes up, margins included, and make sure it’s in an allowed area and doesn’t clash with another ad.
04
Check the quote and your details
The form shows the area covered, the county and the yearly price. Changing the size or area can change the price. Enter the business name, your email and the requested details; confirm the rights and conditions before sending.
05
Complete the payment and wait for review
Follow the payment screen. The new ad goes to review and you’ll get an answer by email. If the site says demo mode, no real charge was made. Check its status from «My ads».
If something doesn’t go as expected
The location or the area isn’t accepted
Check the allowed area, the permitted size and whether the space is taken. Adjust the position or width and check the quote again.
When you finish
You’ll have sent an ad and know how to check when it goes live.
Check you’ve got it
The logo is legible and I can use it.
I’ve checked the centre, the area and the price.
I know payment comes before review.
Guide on the web: /en/manual/publicar-anuncio-suelo
I want to advertise
Track, fix and renew your ads
Understand each status and see views from your own area.
Before you start
Use the same email you sent the ad with. «My ads» covers ground logos.
Get ready
Follow the steps
Check
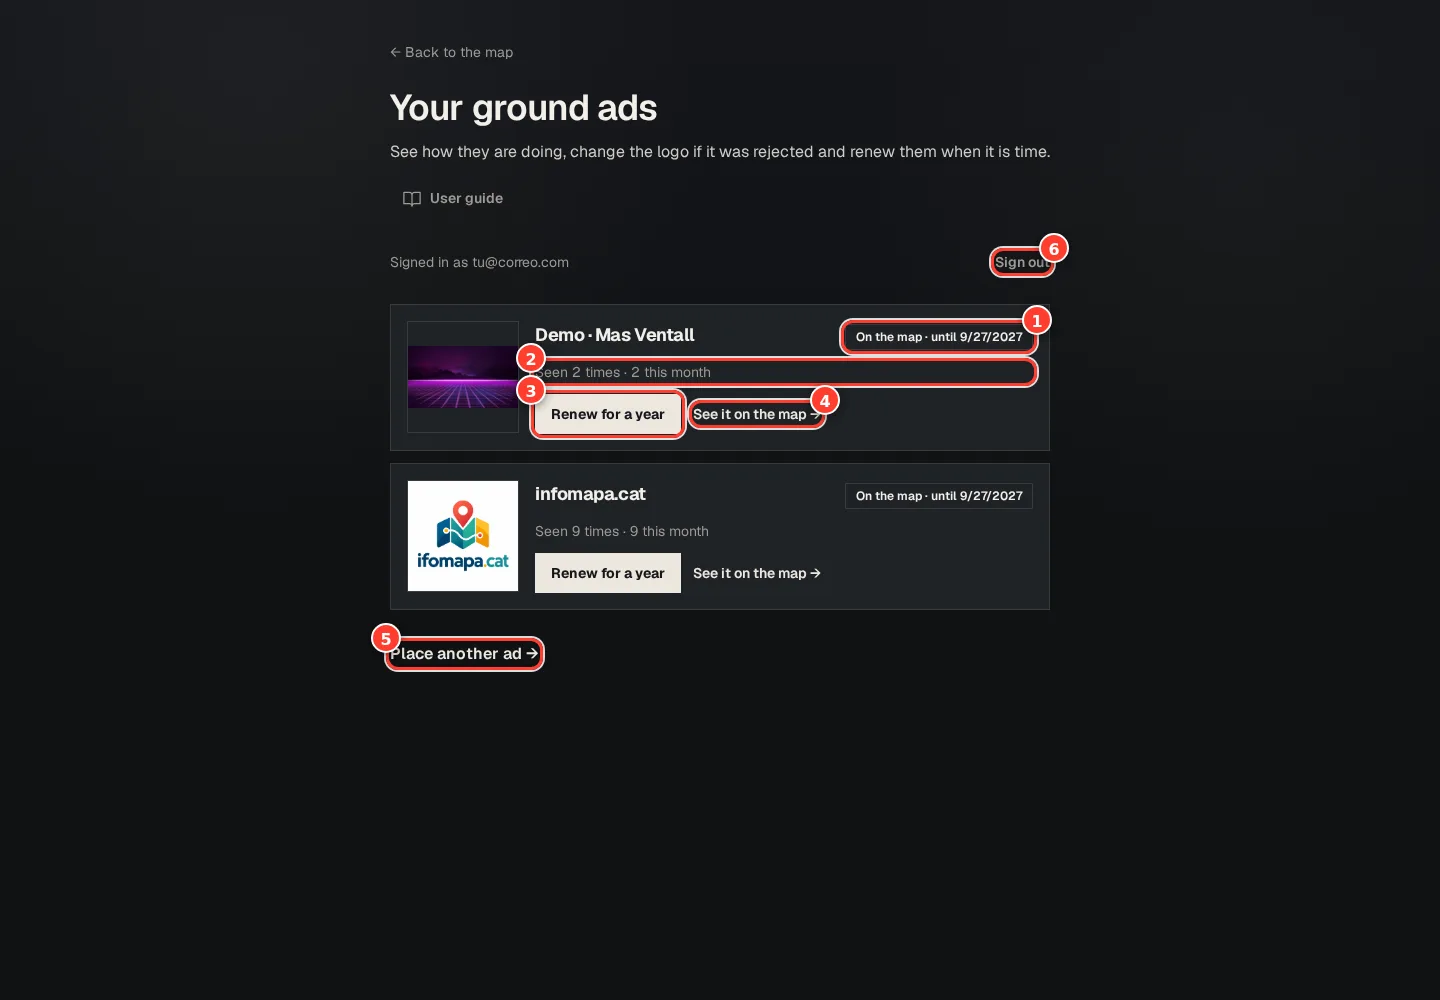
Real screenshot of the tool. Your ads with their status, views and renewal. Details and prices may change.
The status: in review, rejected, on the map (until which date) or expired.
How many times it’s been seen, in total and this month.
Renew for a year, when it’s due.
See it on the map.
Place another ad.
Sign out.
Step by step
01
Go to «My ads»
Request a link with your email («Email me the link»), open the message and confirm the sign-in. If no ads appear, check that you used the email from the purchase.
02
Read the status before acting
«Unpaid» means the payment still needs completing. «In review» means it’s being checked. «On the map» means it’s live. «Needs fixing» shows a review problem and «Expired» means its period has ended.
03
Fix whatever you’re asked to
If it’s rejected, read «What is wrong», prepare the corrected logo and press «Send for review». Use this route to fix the existing request instead of buying another for the same case.
04
Check the location and views
Press «See it on the map» and zoom in on the area. The space shows how many times it’s been seen in total and this month. These are views, not unique people, bookings or sales; this format has no link.
05
Renew when it’s due
Check the expiry date and the price of «Renew for a year». Check the price before confirming. If a payment is cancelled, the management screen shows whether it can still be resumed.
If something doesn’t go as expected
It’s live but I can’t see it from far away
Open «See it on the map» and zoom in. Logos are shown to scale and don’t have to be visible in the overview of the whole county.
When you finish
You’ll know what’s missing before it goes live, how to fix a rejection and how to handle renewal.
Check you’ve got it
I know how to read my ad’s status.
I’ve found the expiry date and the views.
Guide on the web: /en/manual/gestionar-anuncios
I want to advertise
Prepare a clear, measurable campaign
Provide good materials and understand spaces, rotation and metrics.
Before you start
Campaigns in advertising spaces are prepared with the directory team. This guide doesn’t activate a campaign or replace buying one.
Get ready
Follow the steps
Check
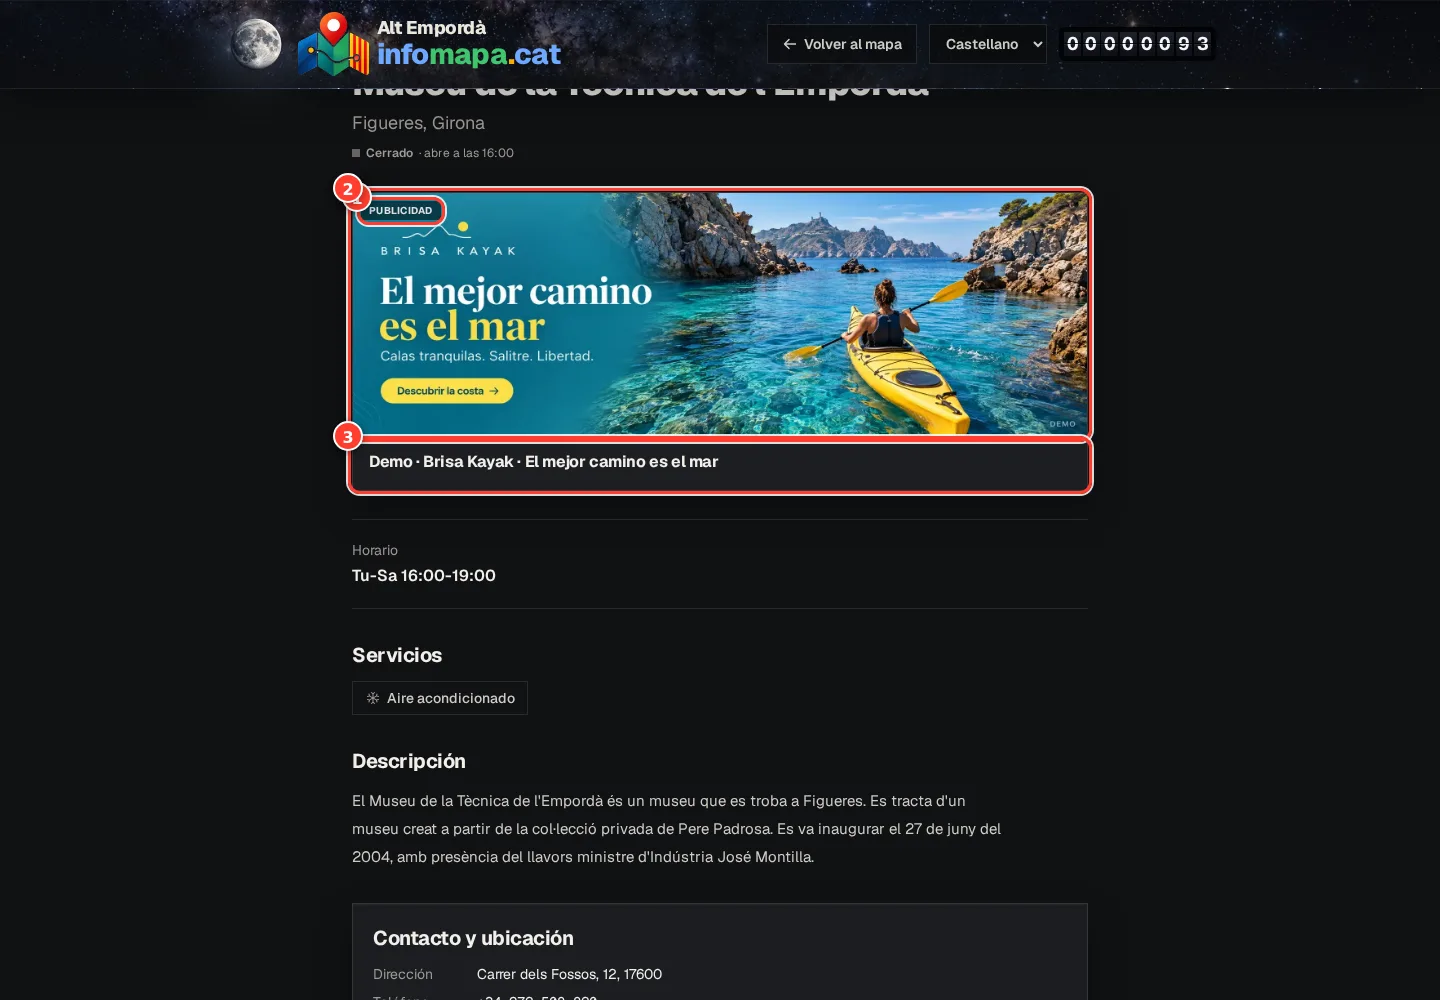
Real screenshot of the tool. This is how a campaign ad looks inside a listing. Details and prices may change.
Always marked as «Advertising».
The creative: an image or a short video. The message must read in a second, on phones too.
The advertiser and the title, with the link to wherever you want to take people.
Step by step
01
Define goal, space and period
Say what you want to communicate and where the ad should lead. Agree on header, map, top of listing or bottom of listing, plus start date, end date and language. How visible each space is depends on the screen and device.
02
Prepare the creative
You can provide text, an image or a video depending on the space. Texts allow up to 200 words; images up to 5 MB; uploaded videos up to 25 MB. YouTube or Vimeo links are also accepted. Confirm the space’s dimensions before designing.
03
Check the preview
Check that it reads well on a phone, the usage rights, that the advertiser is identified and the final link. Video must be tapped to play. An offer should explain its conditions without making visitors guess them.
04
Understand how rotation works
Several ads can share a space. Rotation uses weights: with weights 3 and 1, the expected split is roughly 75% and 25% between those two eligible ads. It isn’t a promise of an exact number of impressions. Dates, language and status also decide whether it appears.
05
Ask for a report over the same period
Check the impressions and clicks available for the campaign. A click shows interaction, not a sale. If you work out a click-through rate, divide clicks by impressions for the same period and multiply by 100; without impressions the rate can’t be calculated.
If something doesn’t go as expected
I don’t see my ad every time I open the site
It may share the rotation, depend on the language or be outside its dates. Ask the team to check the space, status and schedule.
When you finish
You’ll have a specific list of materials and questions to prepare your campaign.
Check you’ve got it
I’ve agreed on space, dates and language.
The creative reads well on a phone and the link works.
I know which metrics will be measured and what they mean.